Eucalyptus is an open source implementation of the Amazon cloud API (https://www.eucalyptus.cloud). It provides the user with a convenient web interface for configuring and launching virtual machines. The virtual machines are accessed using ssh and typically act as servers for some project.
Gaining Access
Access to the UWL CS Eucalyptus Cloud is provided to students in specific classes or to students working on independent projects or capstones. If you are enrolled in a class that will use the cloud you will be provided with account credentials by your instructor. If you are working on a project or capstone that can make use of the cloud's capabilities you should request an account through your project advisor.
Accounts
Following the AWS (Amazon Web Services) pattern, account login credentials consist of an "account name", a "user name" and a "password". An account always has an "admin" user and in almost all cases there is no reason to create extra users in an account. For example, an account's credentials might consist of
| account name | euler |
| user name | admin |
| password | "e^(i pi) + 1 = 0" |
There are also access keys that can be used for remote command line interaction with the system but the CS Department does not issue or utilize these.
Web Dashboard
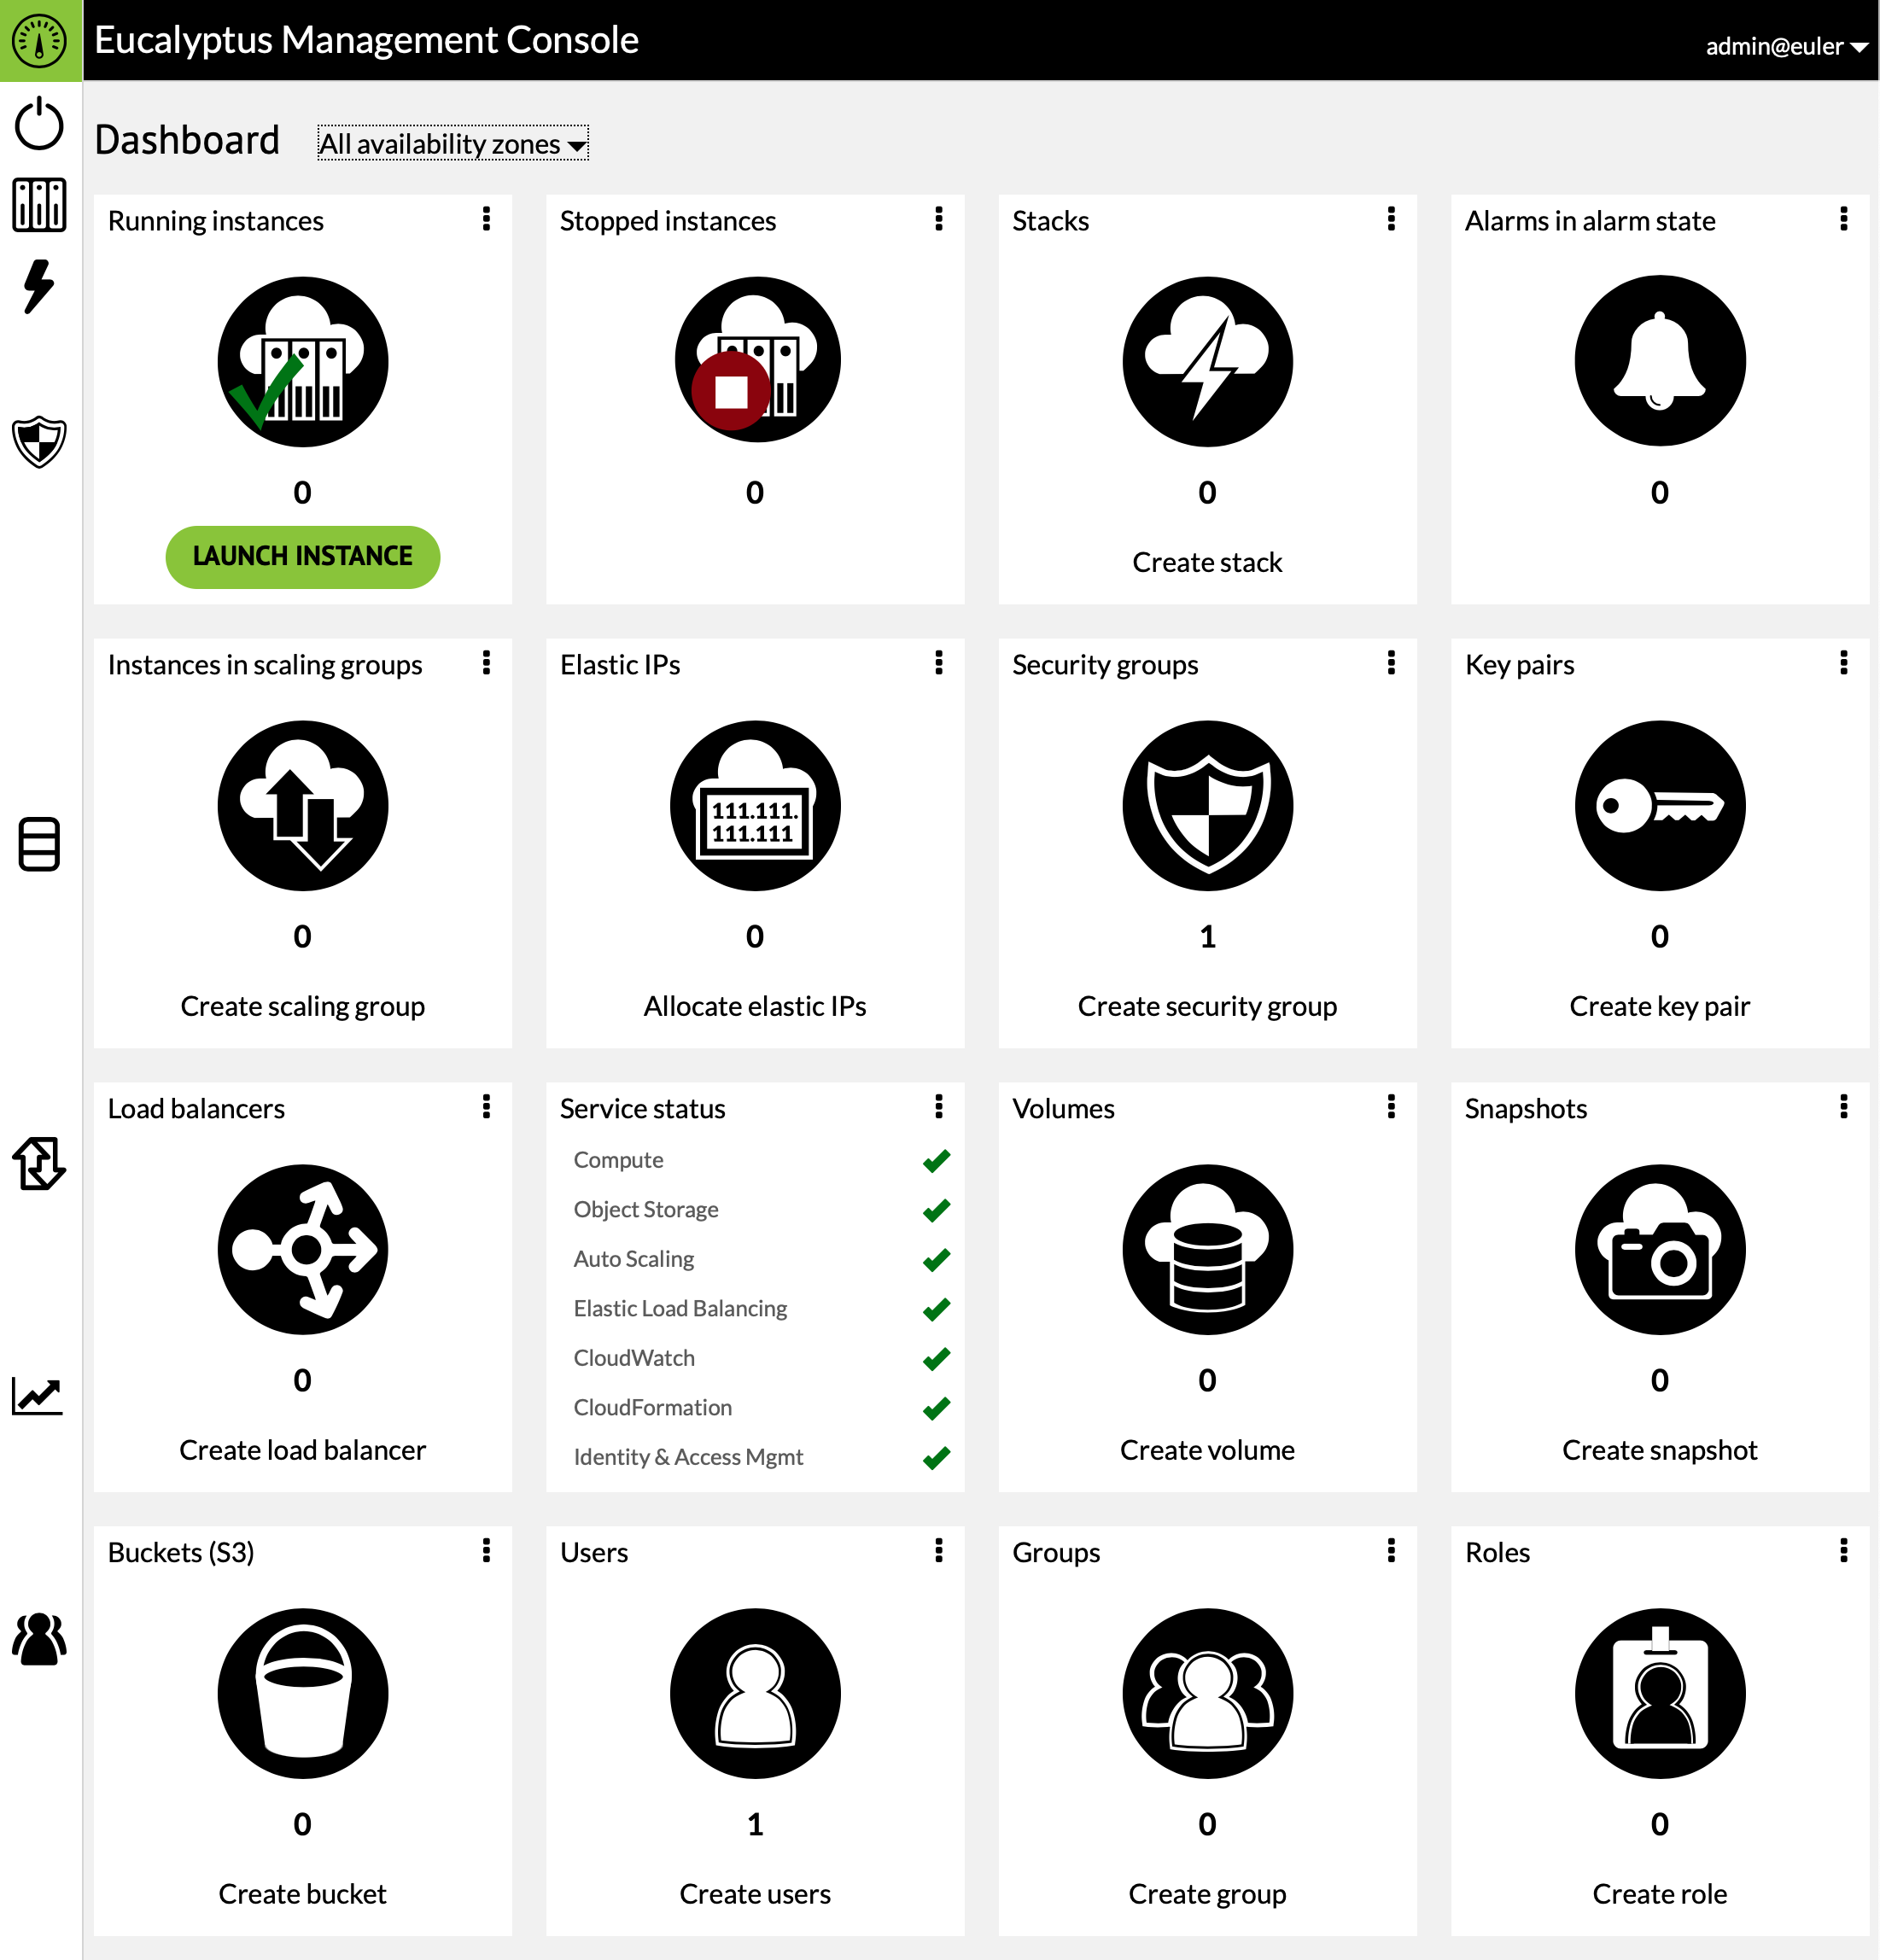 The Web Dashboard for the Eucalyptus Cluster can be found at https://amdahl.cs.uwlax.edu. Logging into the web console with your account credentials presents a Dashboard that provides an overview of the resources in use by your account. The Department's Eucalyptus Cluster sits behind the campus firewall so it is necessary to either be on campus or be connected to the campus VPN in order to access the cluster and its resources.
The most important panels of the Dashboard are
- Running instances - displays a list of the instances (i.e. virtual machines) that are currently running
- Security groups - displays a list of the groups of firewall rules used to control access to instances
- Key pairs - displays the list of public/private key pairs used to authenticate to instances
- Volumes - lists the disk volumes in use including those currently associated with instances
The remaining panels are rarely used in student projects.
Key Pairs
While your account login credentials (account name, user name, password) provide access to the web dashboard, a different mechanism is used to authenticate and login into running instances (i.e. virtual machines). This mechanism relies on public/private key pairs.
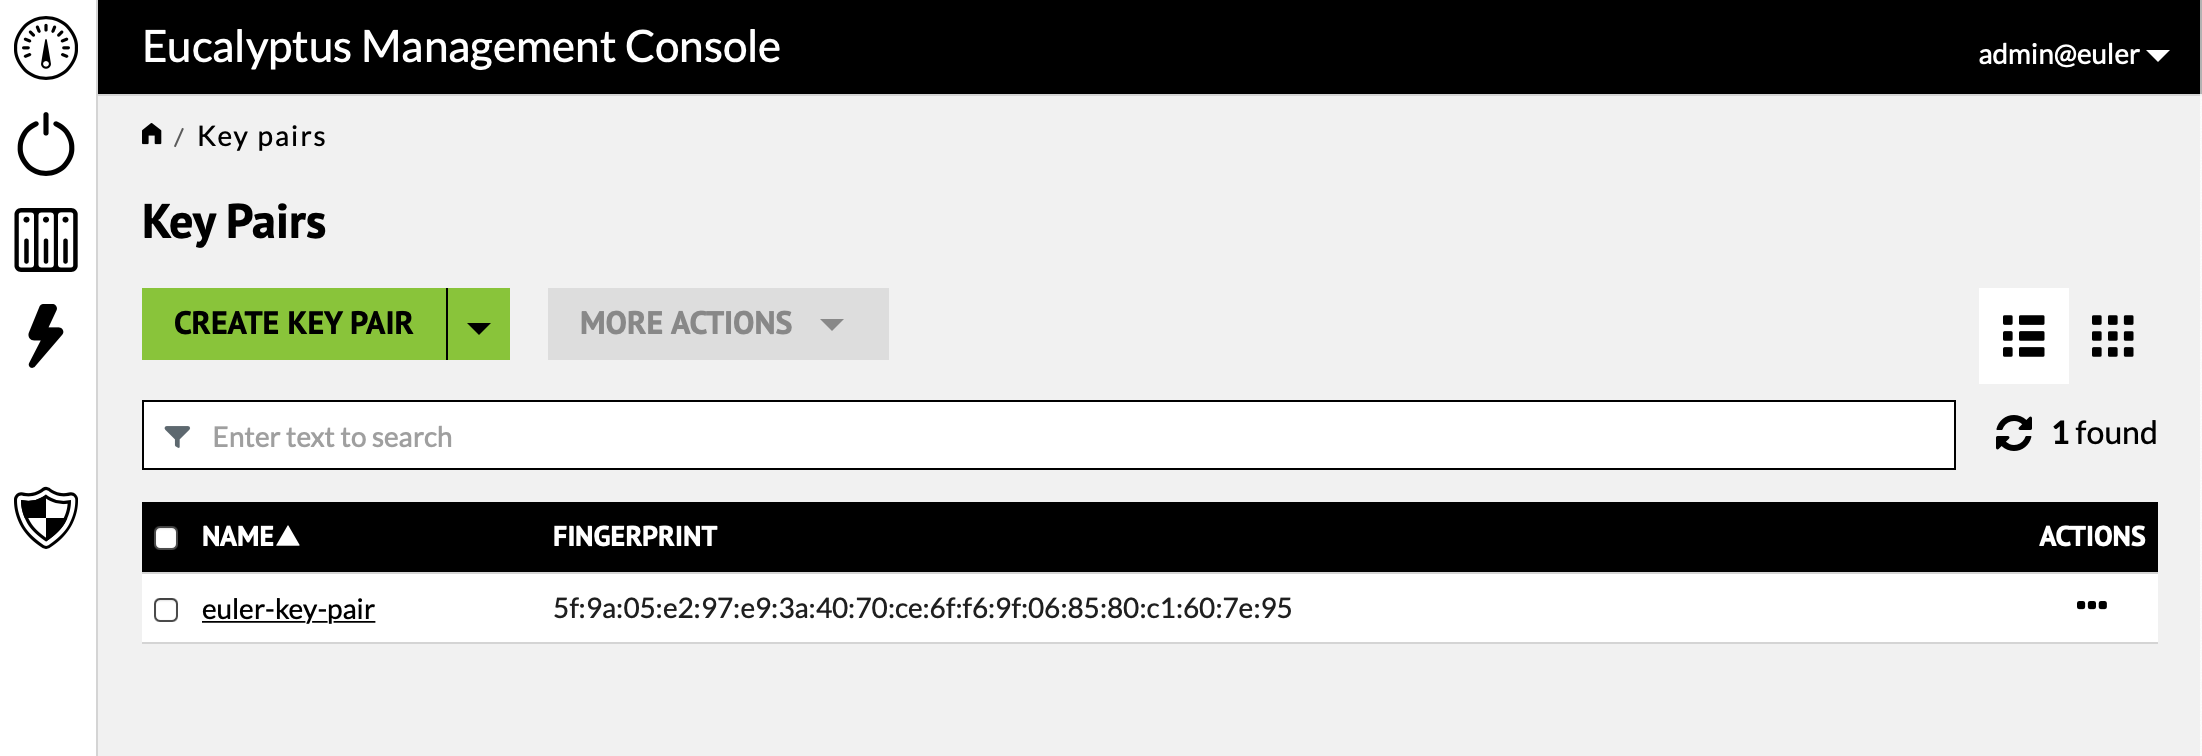
Initially, your account will have no key pairs and you will need to create one through the "Create Key Pair" button. This will result in a file being downloaded through the browser that contains the private part of the key pair. This file will have a ".pem" extension. The file contents will look like
-----BEGIN RSA PRIVATE KEY-----
MIIEowIBAAKCAQEA3YuTdaFk1UwtUa8uc8Vdx7o+1fEb8uNYpx5mIl4XT4jur1k1
.
.
.
e9Cs+fMORBjBNi3MLrc+UuNHm0Z6P0+WisiGCFJ8A0TOPOem4cBU
-----END RSA PRIVATE KEY-----
This file should be moved to a convenient place and the permissions changed so that only the owner has read access (for linux this means "chmod 400 file.pem").
Creating a single key pair is sufficient for almost all circumstances.
Security Groups
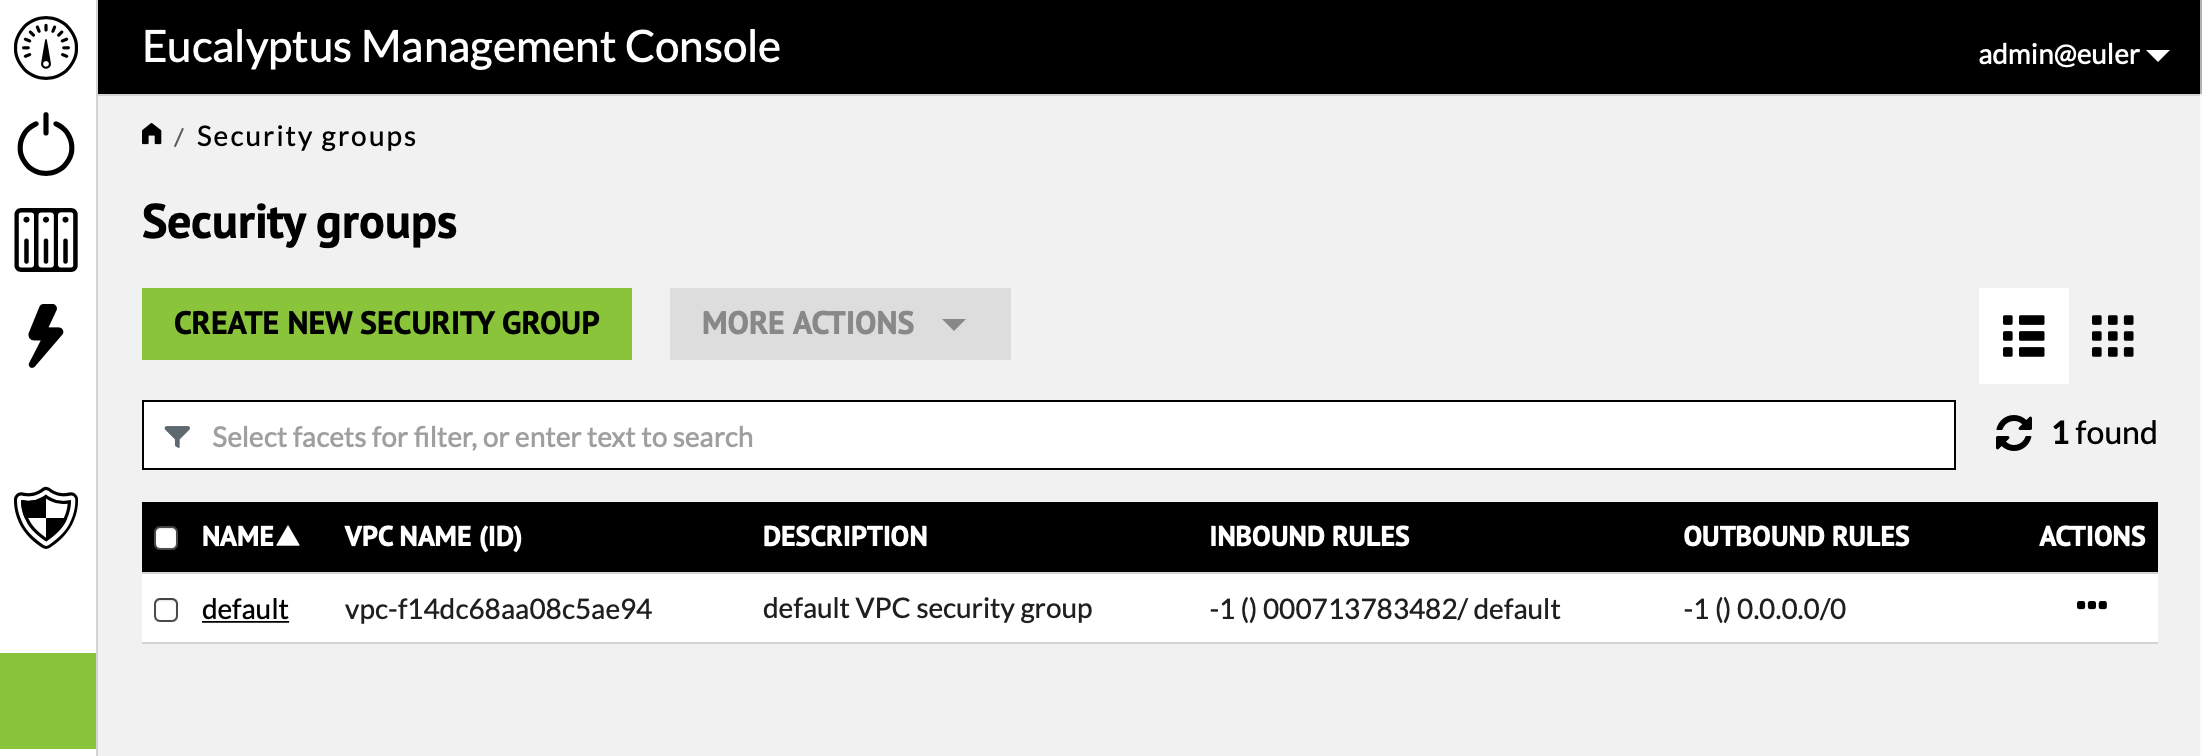
Security groups list the firewall rules that define access to instances. Every account starts with a "default" security group but initially this group provides no real access. Select the "default" group to see its current definition. Note that changes to the security group have immediate effect on running instances.
We are for the most part only concerned with "Inbound" rules. Each rule defines a service port and a range of IP addresses allowed access to that port. At a minimum an SSH rule needs to be provided so that it is possible to access instances.In order
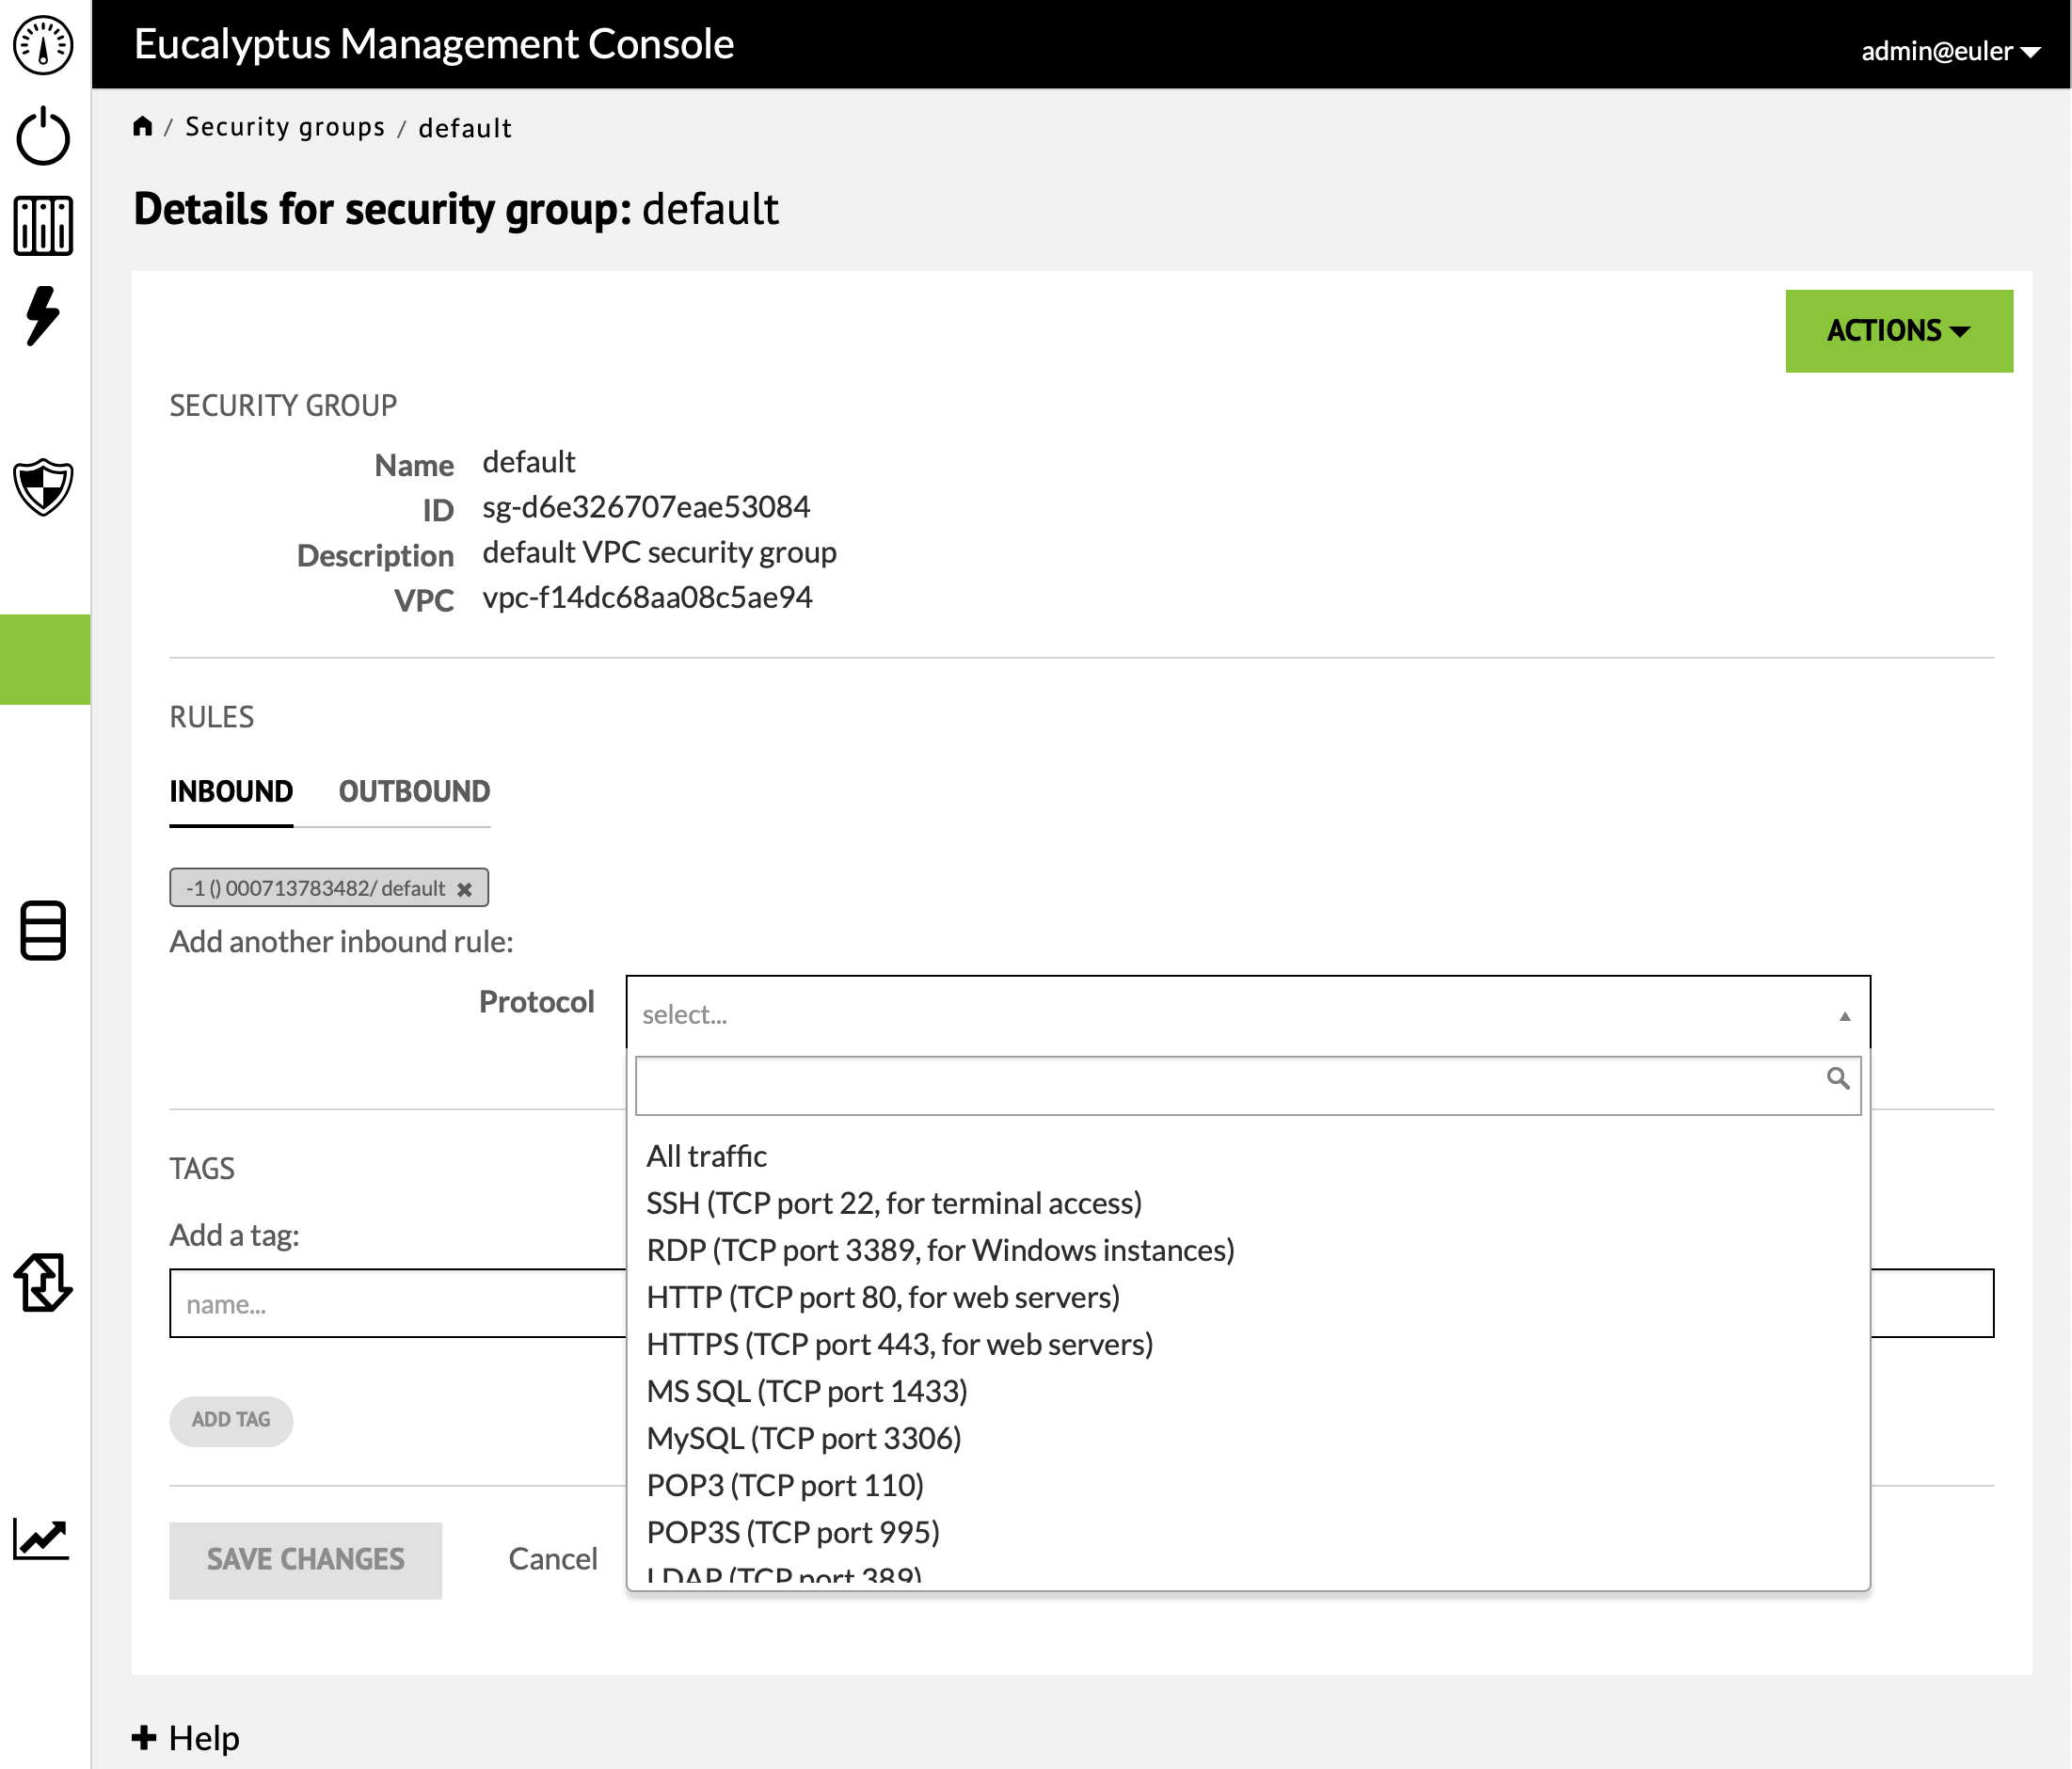
Once SSH has been selected from the pulldown you are presented with further options. The "Port range" fields can be used to specify a range of ports beyond port 22. The "Allow traffic from" section is where you specify the ip addresses of machines that are allowed access on this port. The field expects a CIDR (classless inter-domain routing) of the form "x.x.x.x/y" where "x.x.x.x" specifies an IPv4 address and "/y" indicates the number of bits in the address that need to match. Under this field there is an option to use "0.0.0.0/0" which will match all possible addresses, or a CIDR of the form "a.b.c.d/32", where "a.b.c.d" is you current IPv4 address and "/32" requires a full match. Eventhough the Eucalyptus Cluster is behind the campus firewall some care must be taken in determining the CIDR. Most likely you will be accessing the cloud through the campus wireless network or the campus VPN. The "Use my IP address" option will show you your current address and a CIDR constructed from this by using "/8" or "/16" will probably provide a reasonable choice.
FIND OUT WHAT THE CURRENT ADDRESS RANGES ARE!!!!.
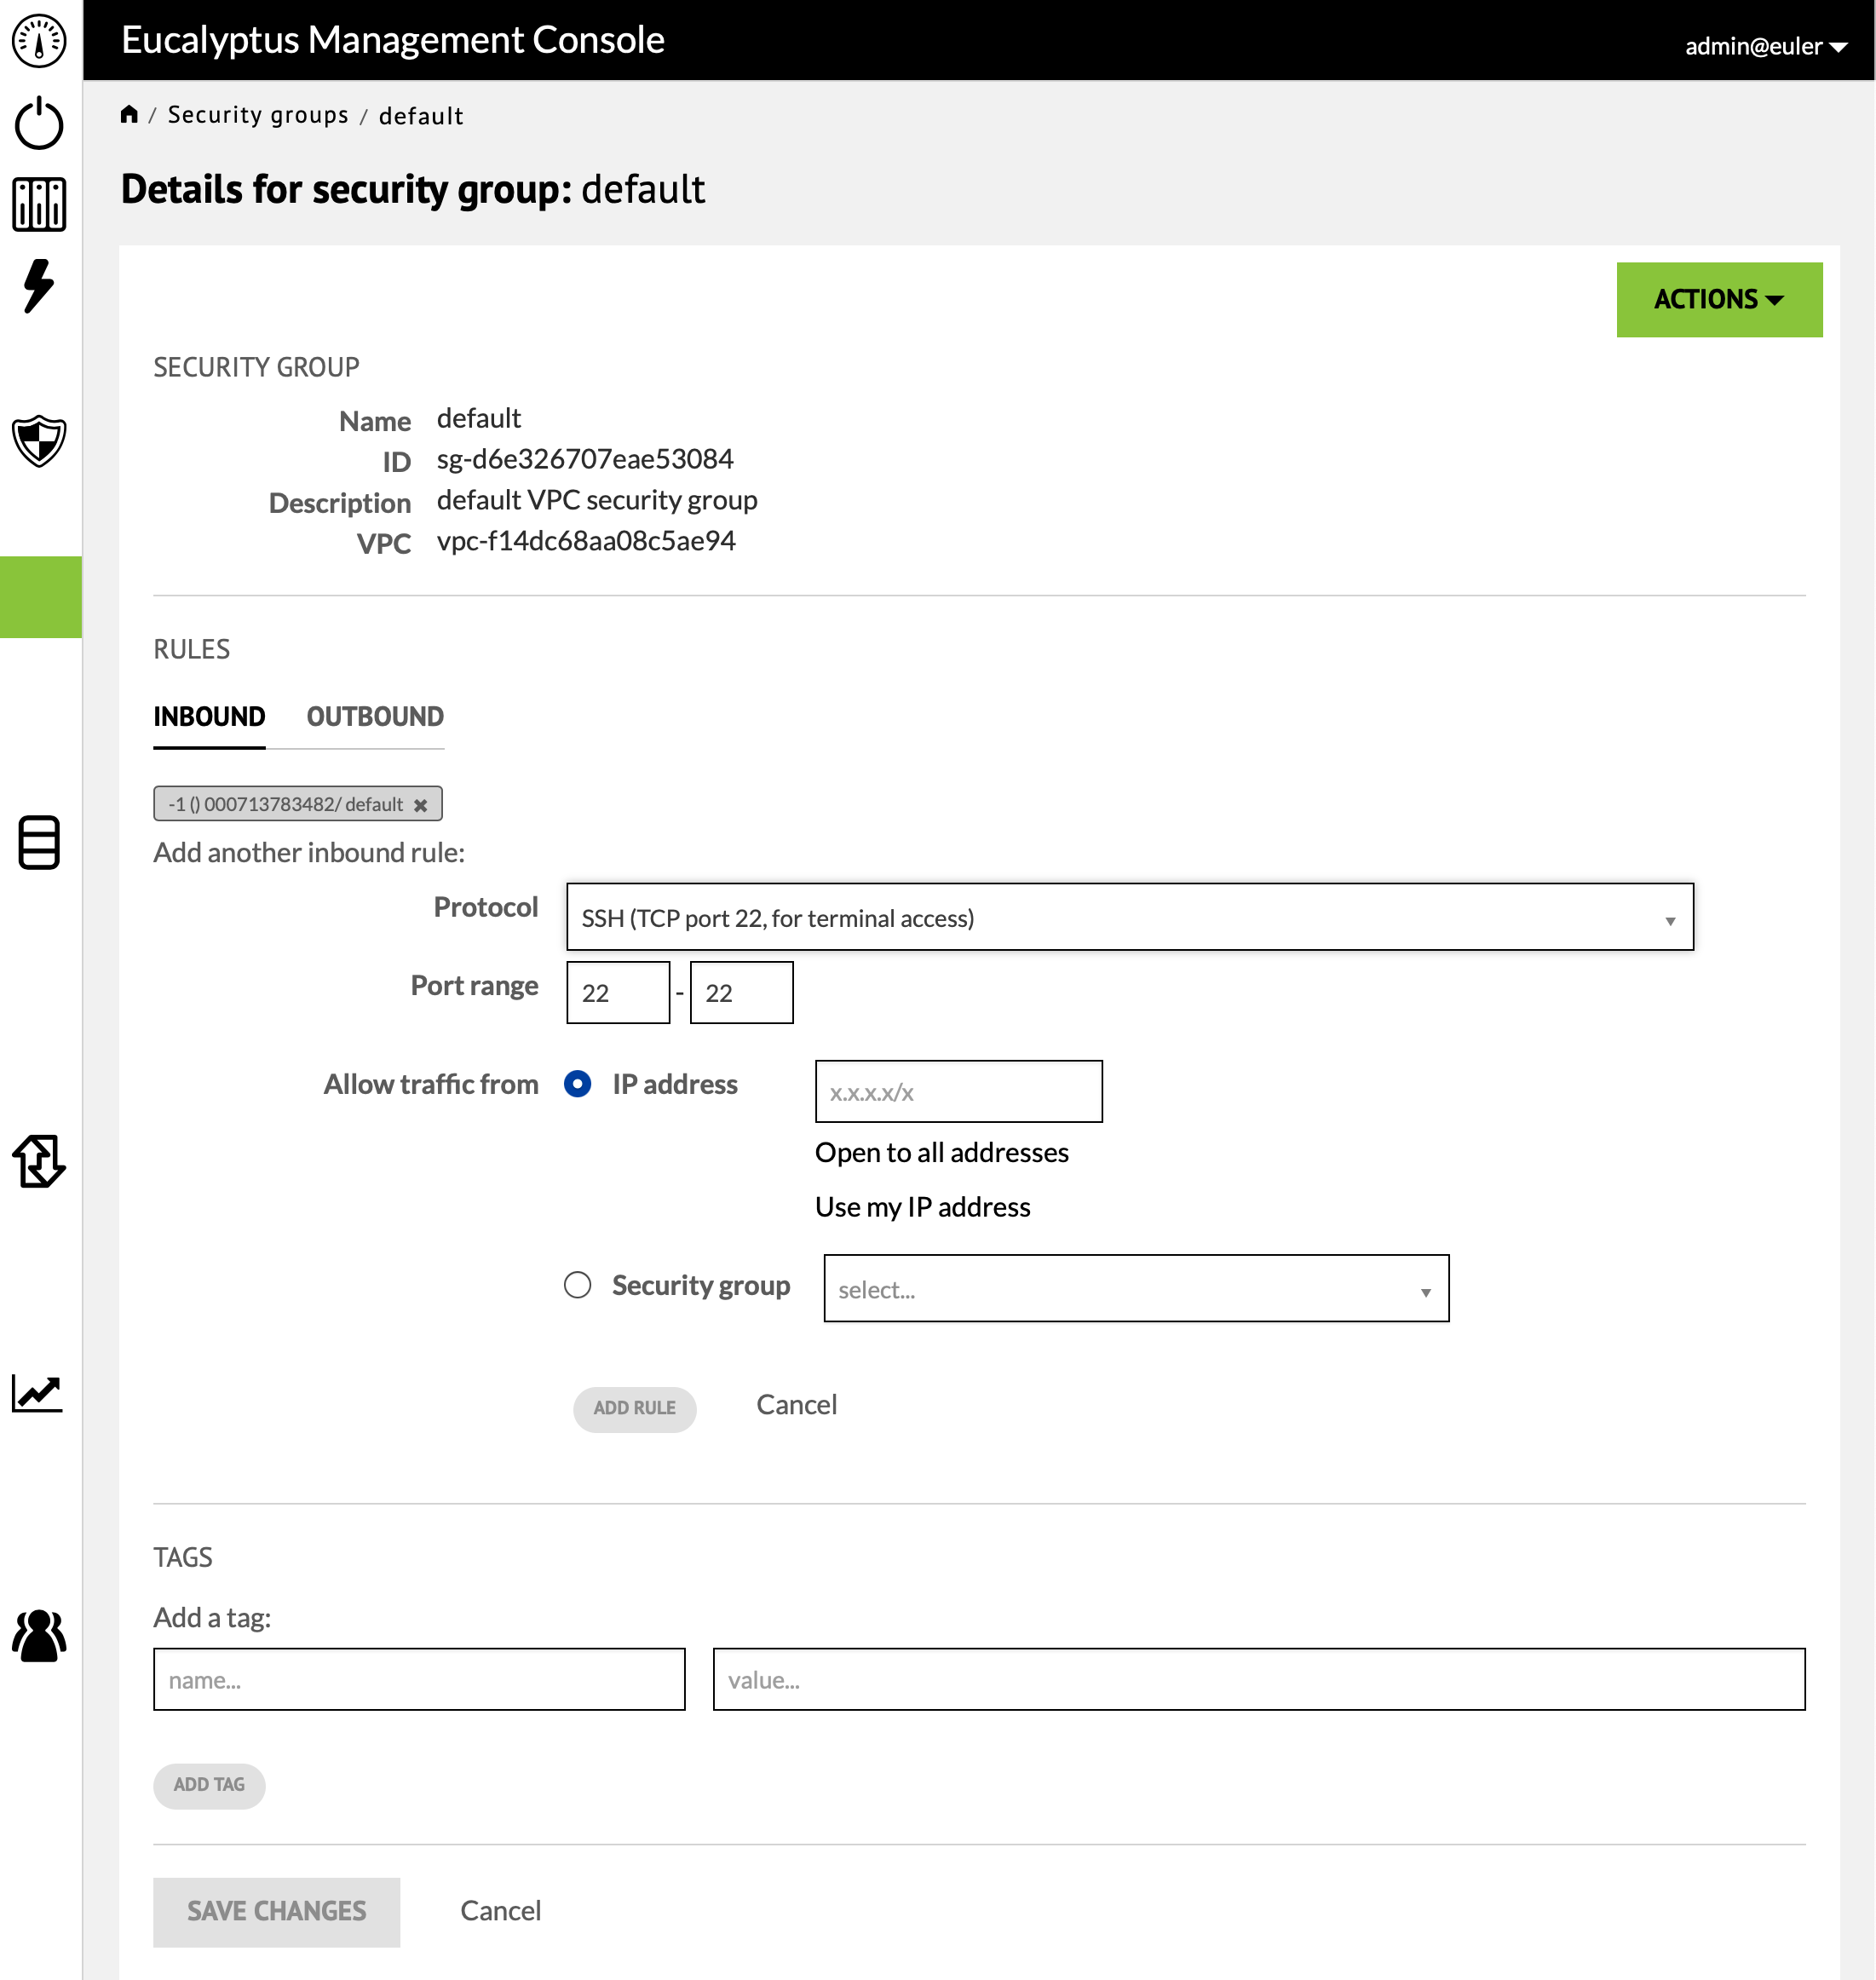
Once you have specified the CIDR, press "Add Rule". You may want to add other service ports such as HTTP depending on what your instance will be doing. It is also convenient to include a rule for Custom ICMP which will allow you instance to respond to "pings". When you have completed the list of rules press "SAVE CHANGES".
Images and Volumes
"Images" are the disk image files that are used to start instances. The list of available images can be found at the ![]() icon in the left side-bar.
icon in the left side-bar.
There are two types of images: instance store and EBS (Elastic Block Store). Instance Store images create "ephemeral" instances which exist until terminated but have no persistent storage. EBS images exist until termianted but can be stopped and restarted with a persistent boot device image. Instance Store images make sense when the image will be used to create instances that will run some service that requires no further configuration. An isntance is started, runs as long as needed and is then termianted.
An EBS image makes sense when further configuration work will be done or the instance will be used for software development and you want this work to persist if you stop and restart the instance.

Instances created from EBS images have a volume as their boot device. Volumes can be tracked through the "Volumes" panel on the dashboard. Volumes can be thought of as disk drives, of some configured size, which can be attached to and detached from running instances. When an instance is created from an EBS image a volume is created and is populated with the contents of the EBS image.
Instances
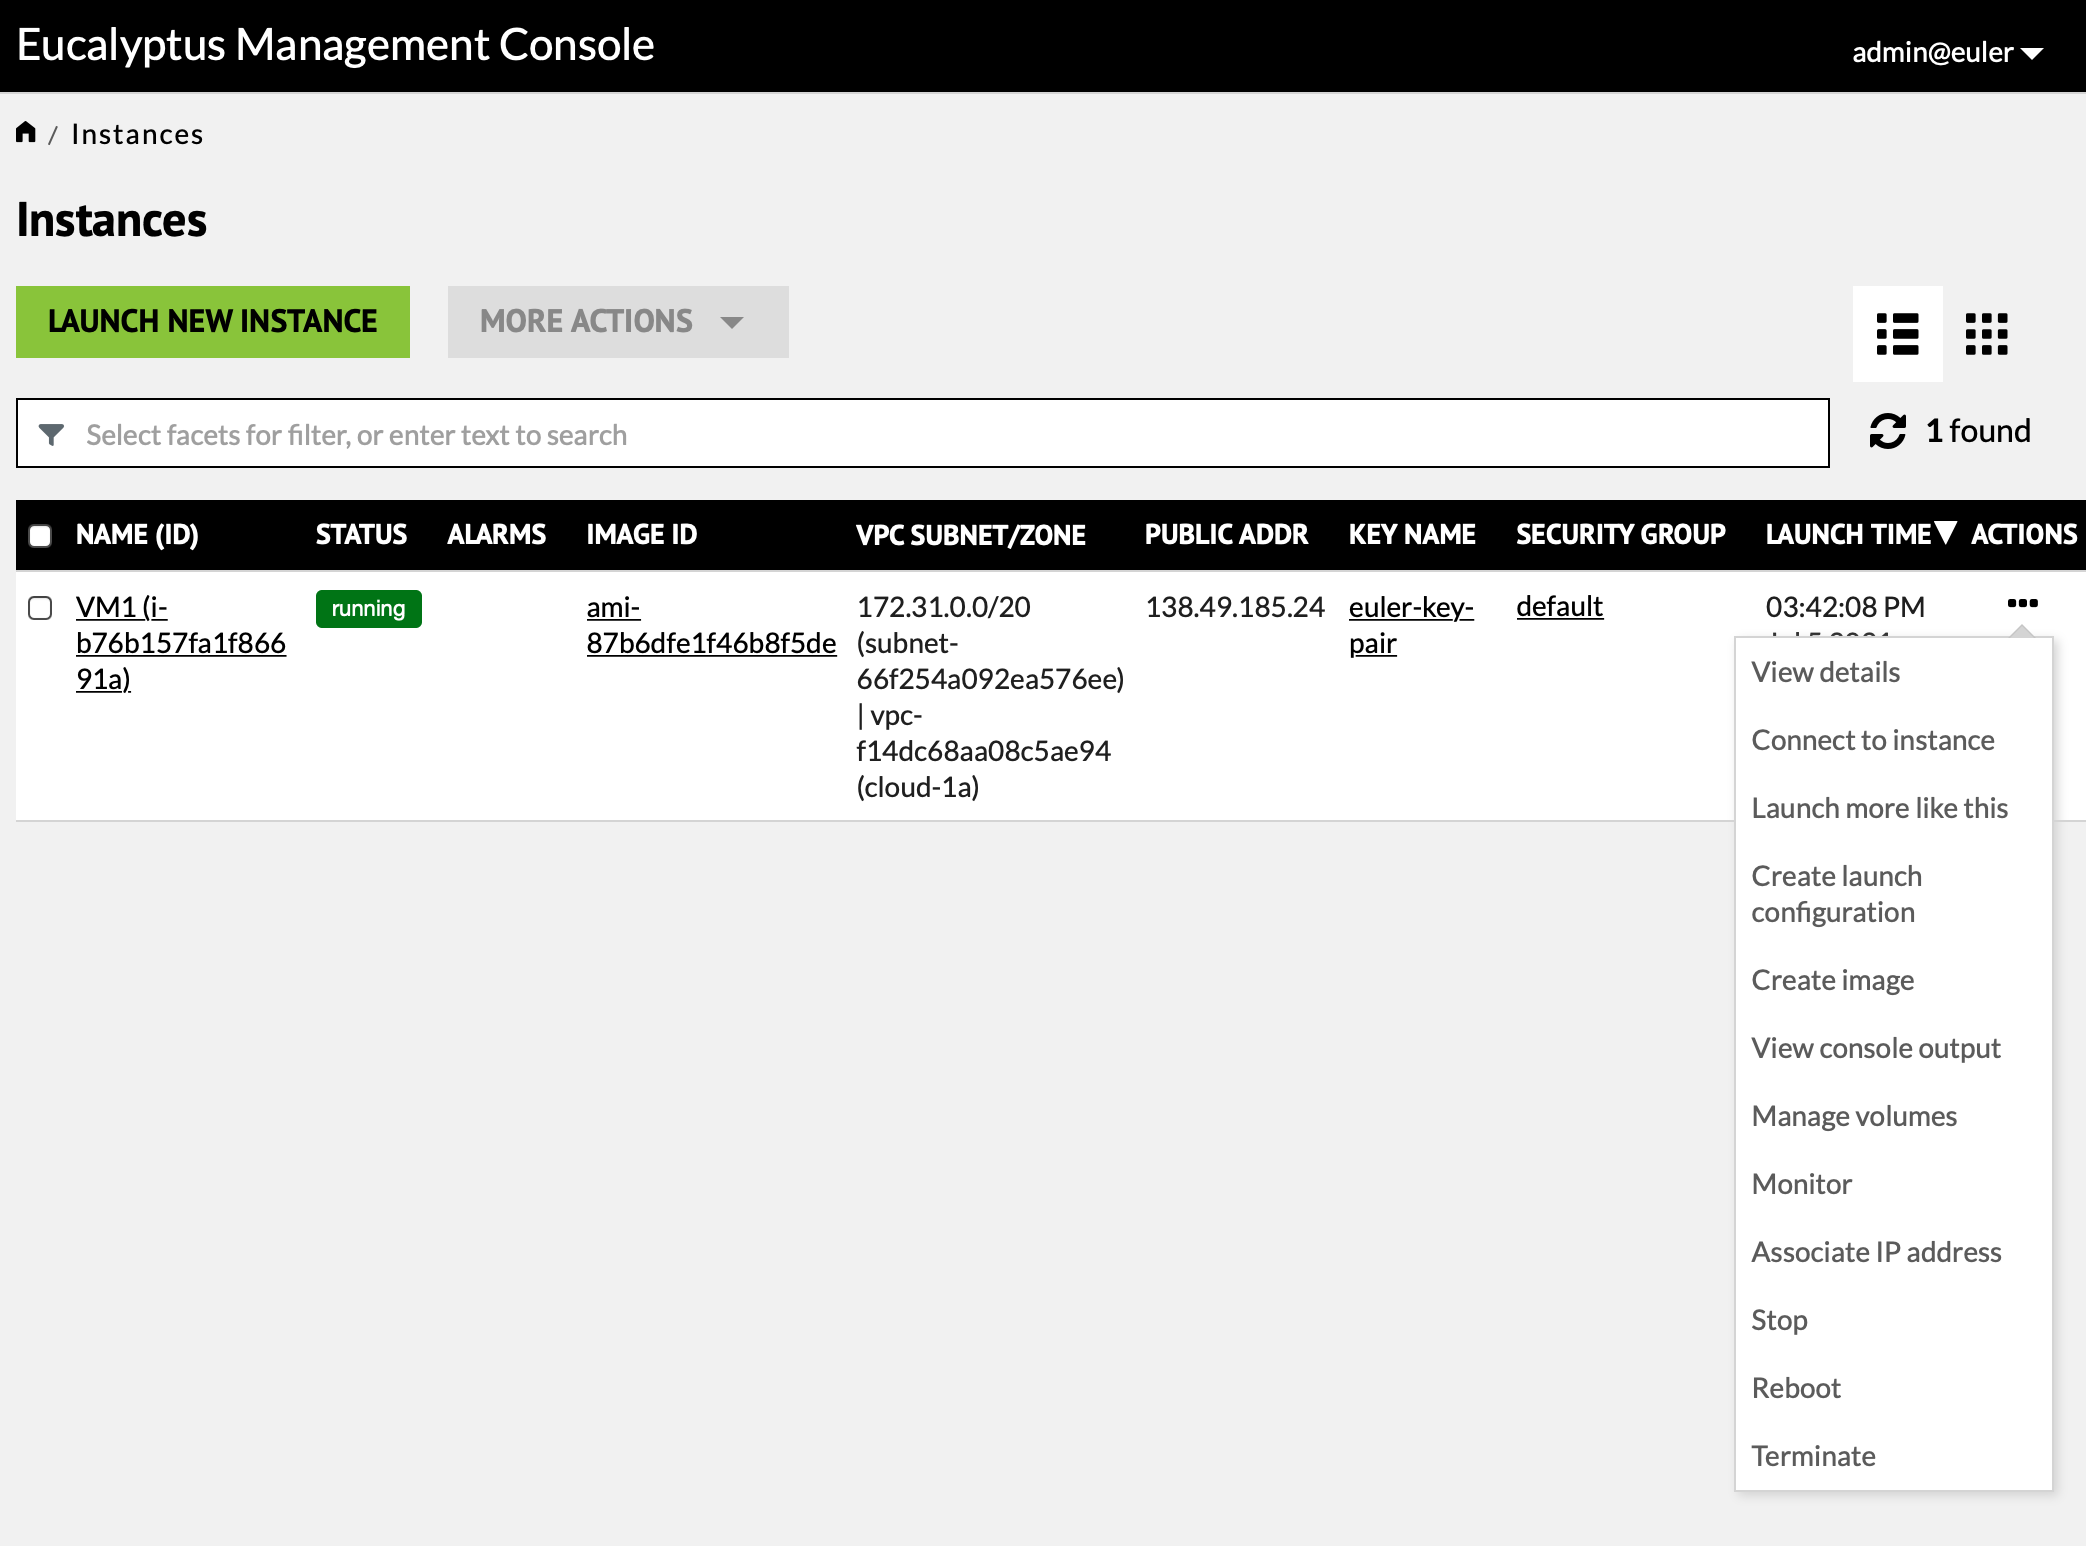
The "Running Instances" panel of the dashboard is the one where instances are created and manipulated. The list of running instances displays serveral pieces of information: instance name, status, public address, key name, security group and launch time.
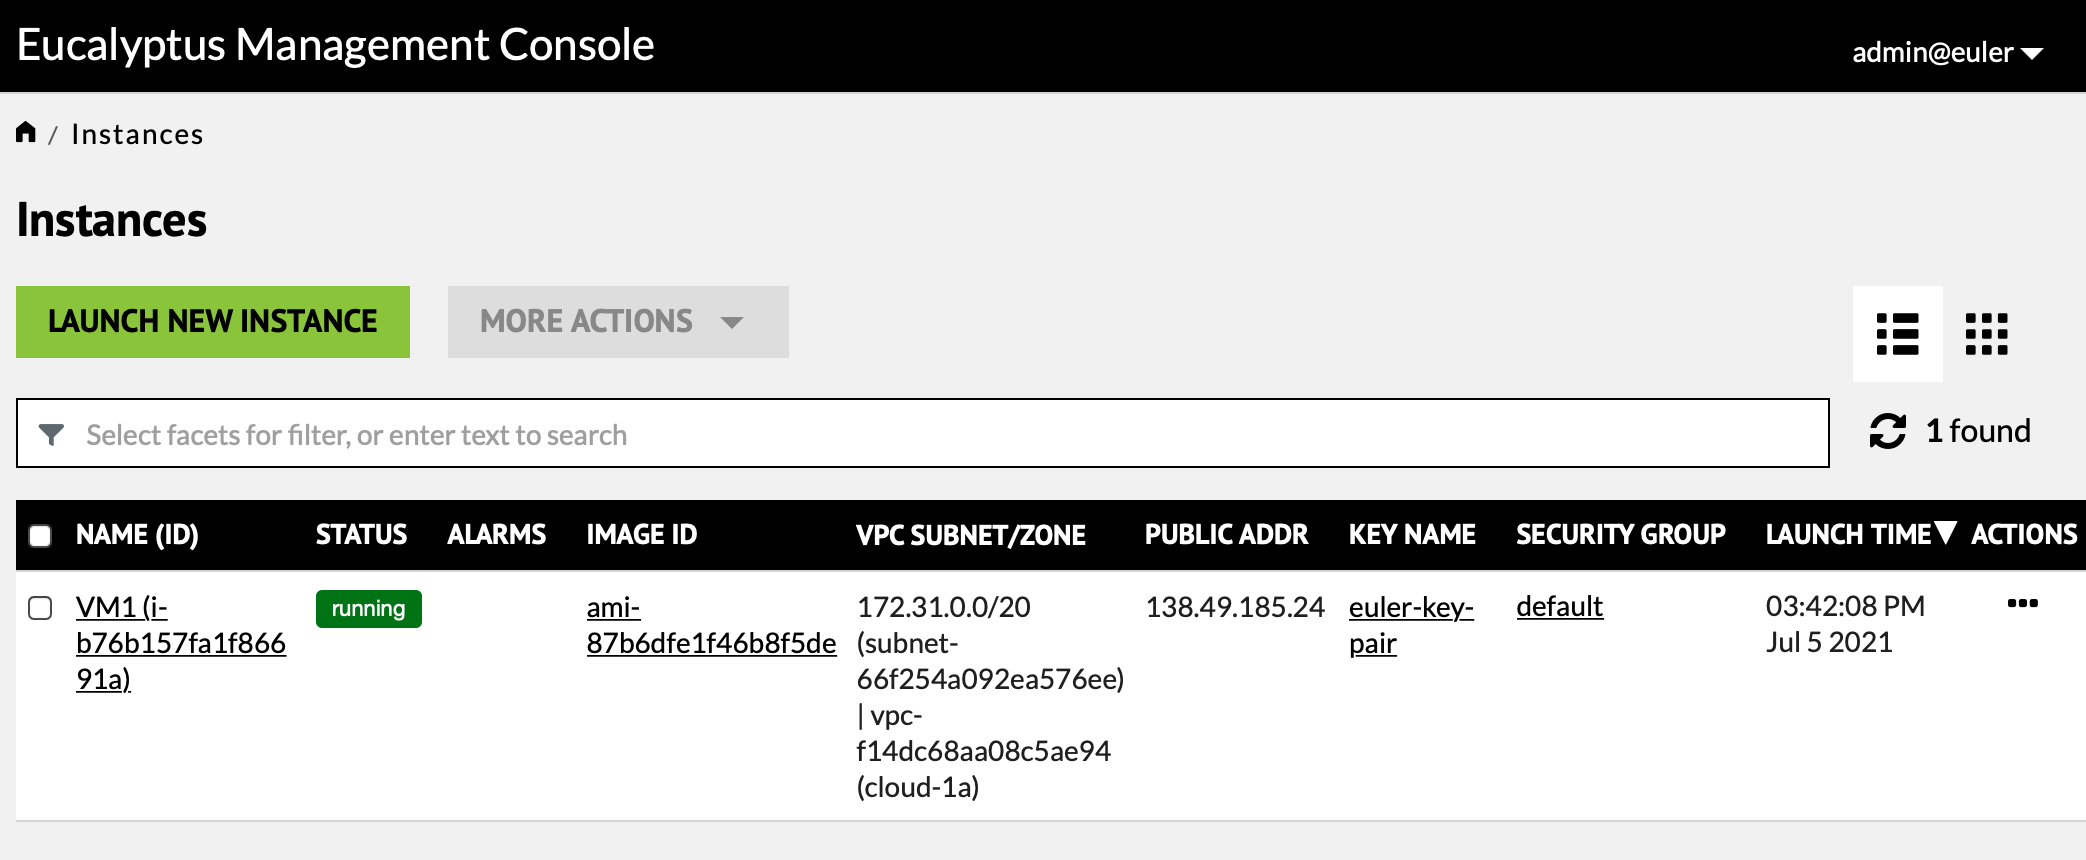
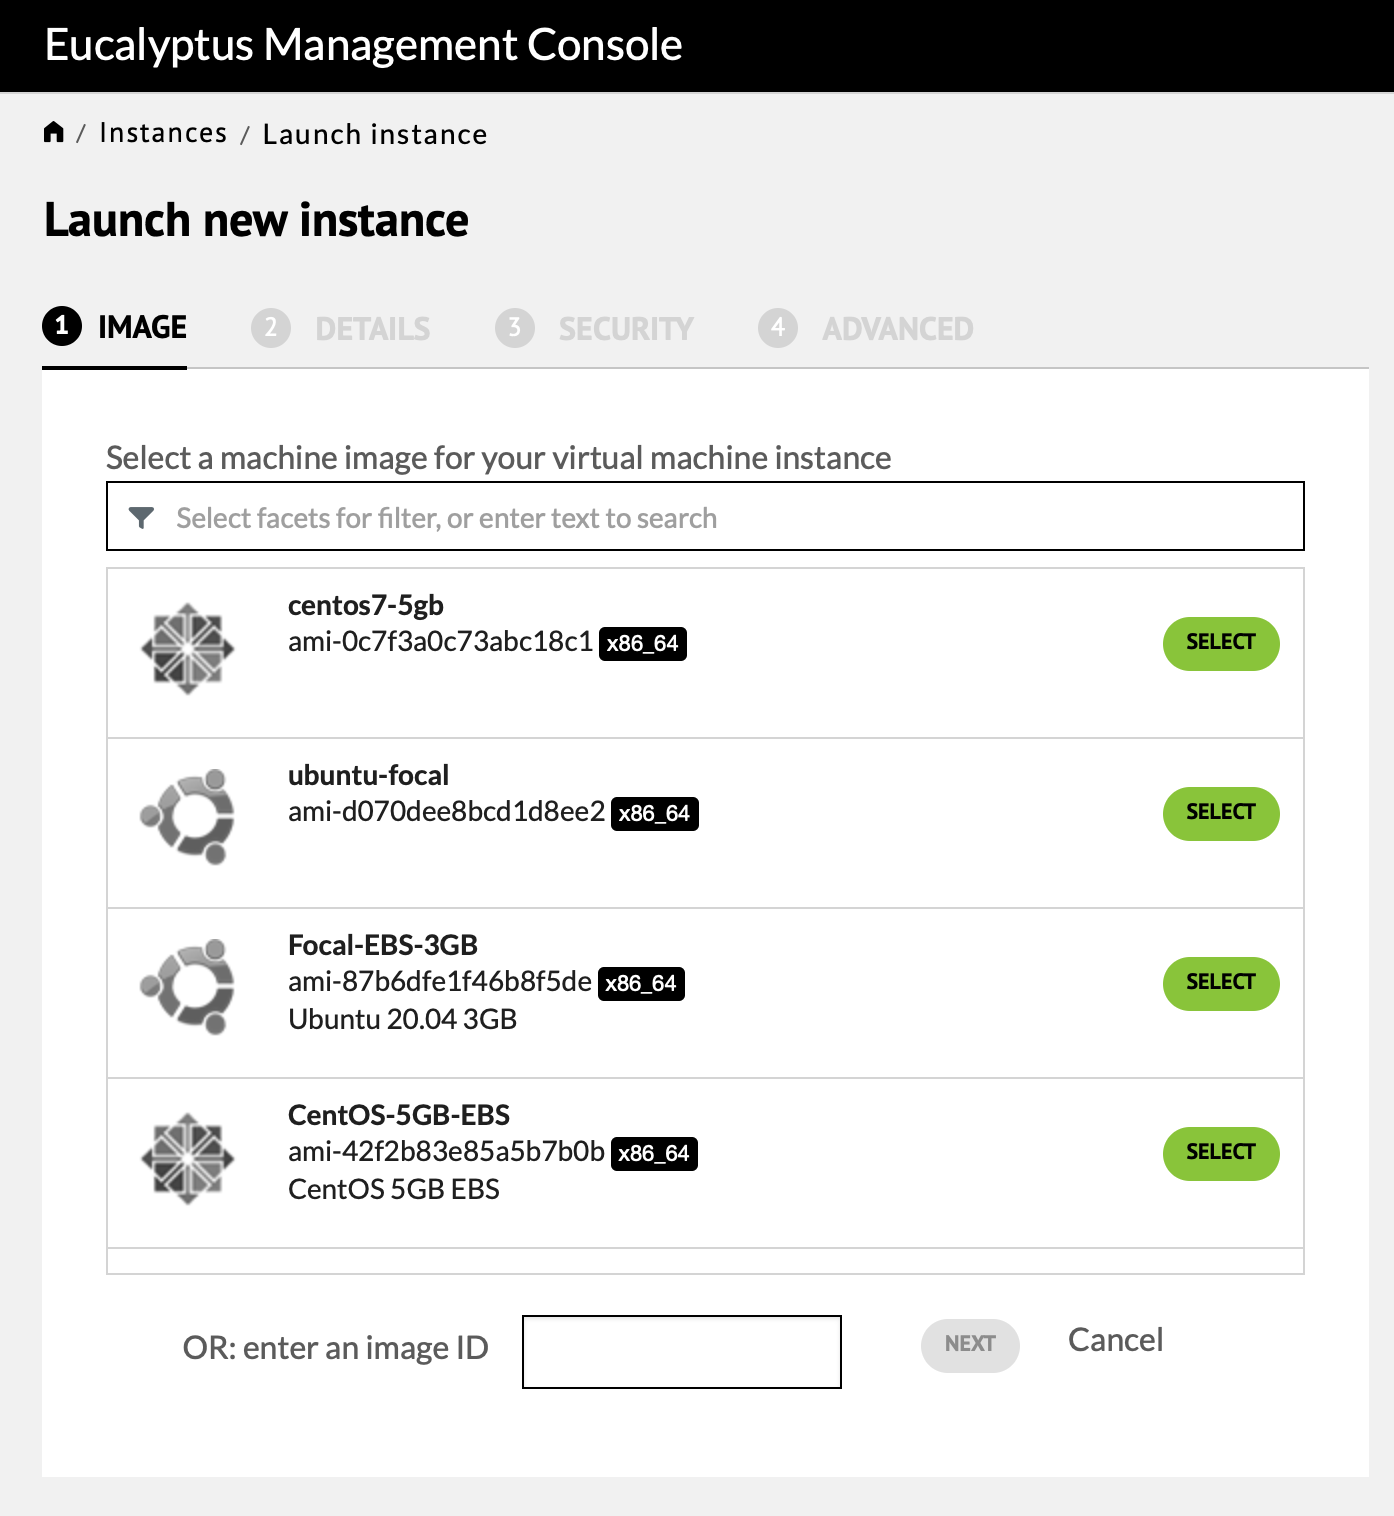
Press "Launch New Instance" to start the instance creation process. The first screen shows the images that can be used to lanuch a new instance. Depending on your needs you might select the Ubuntu Focal EBS image.
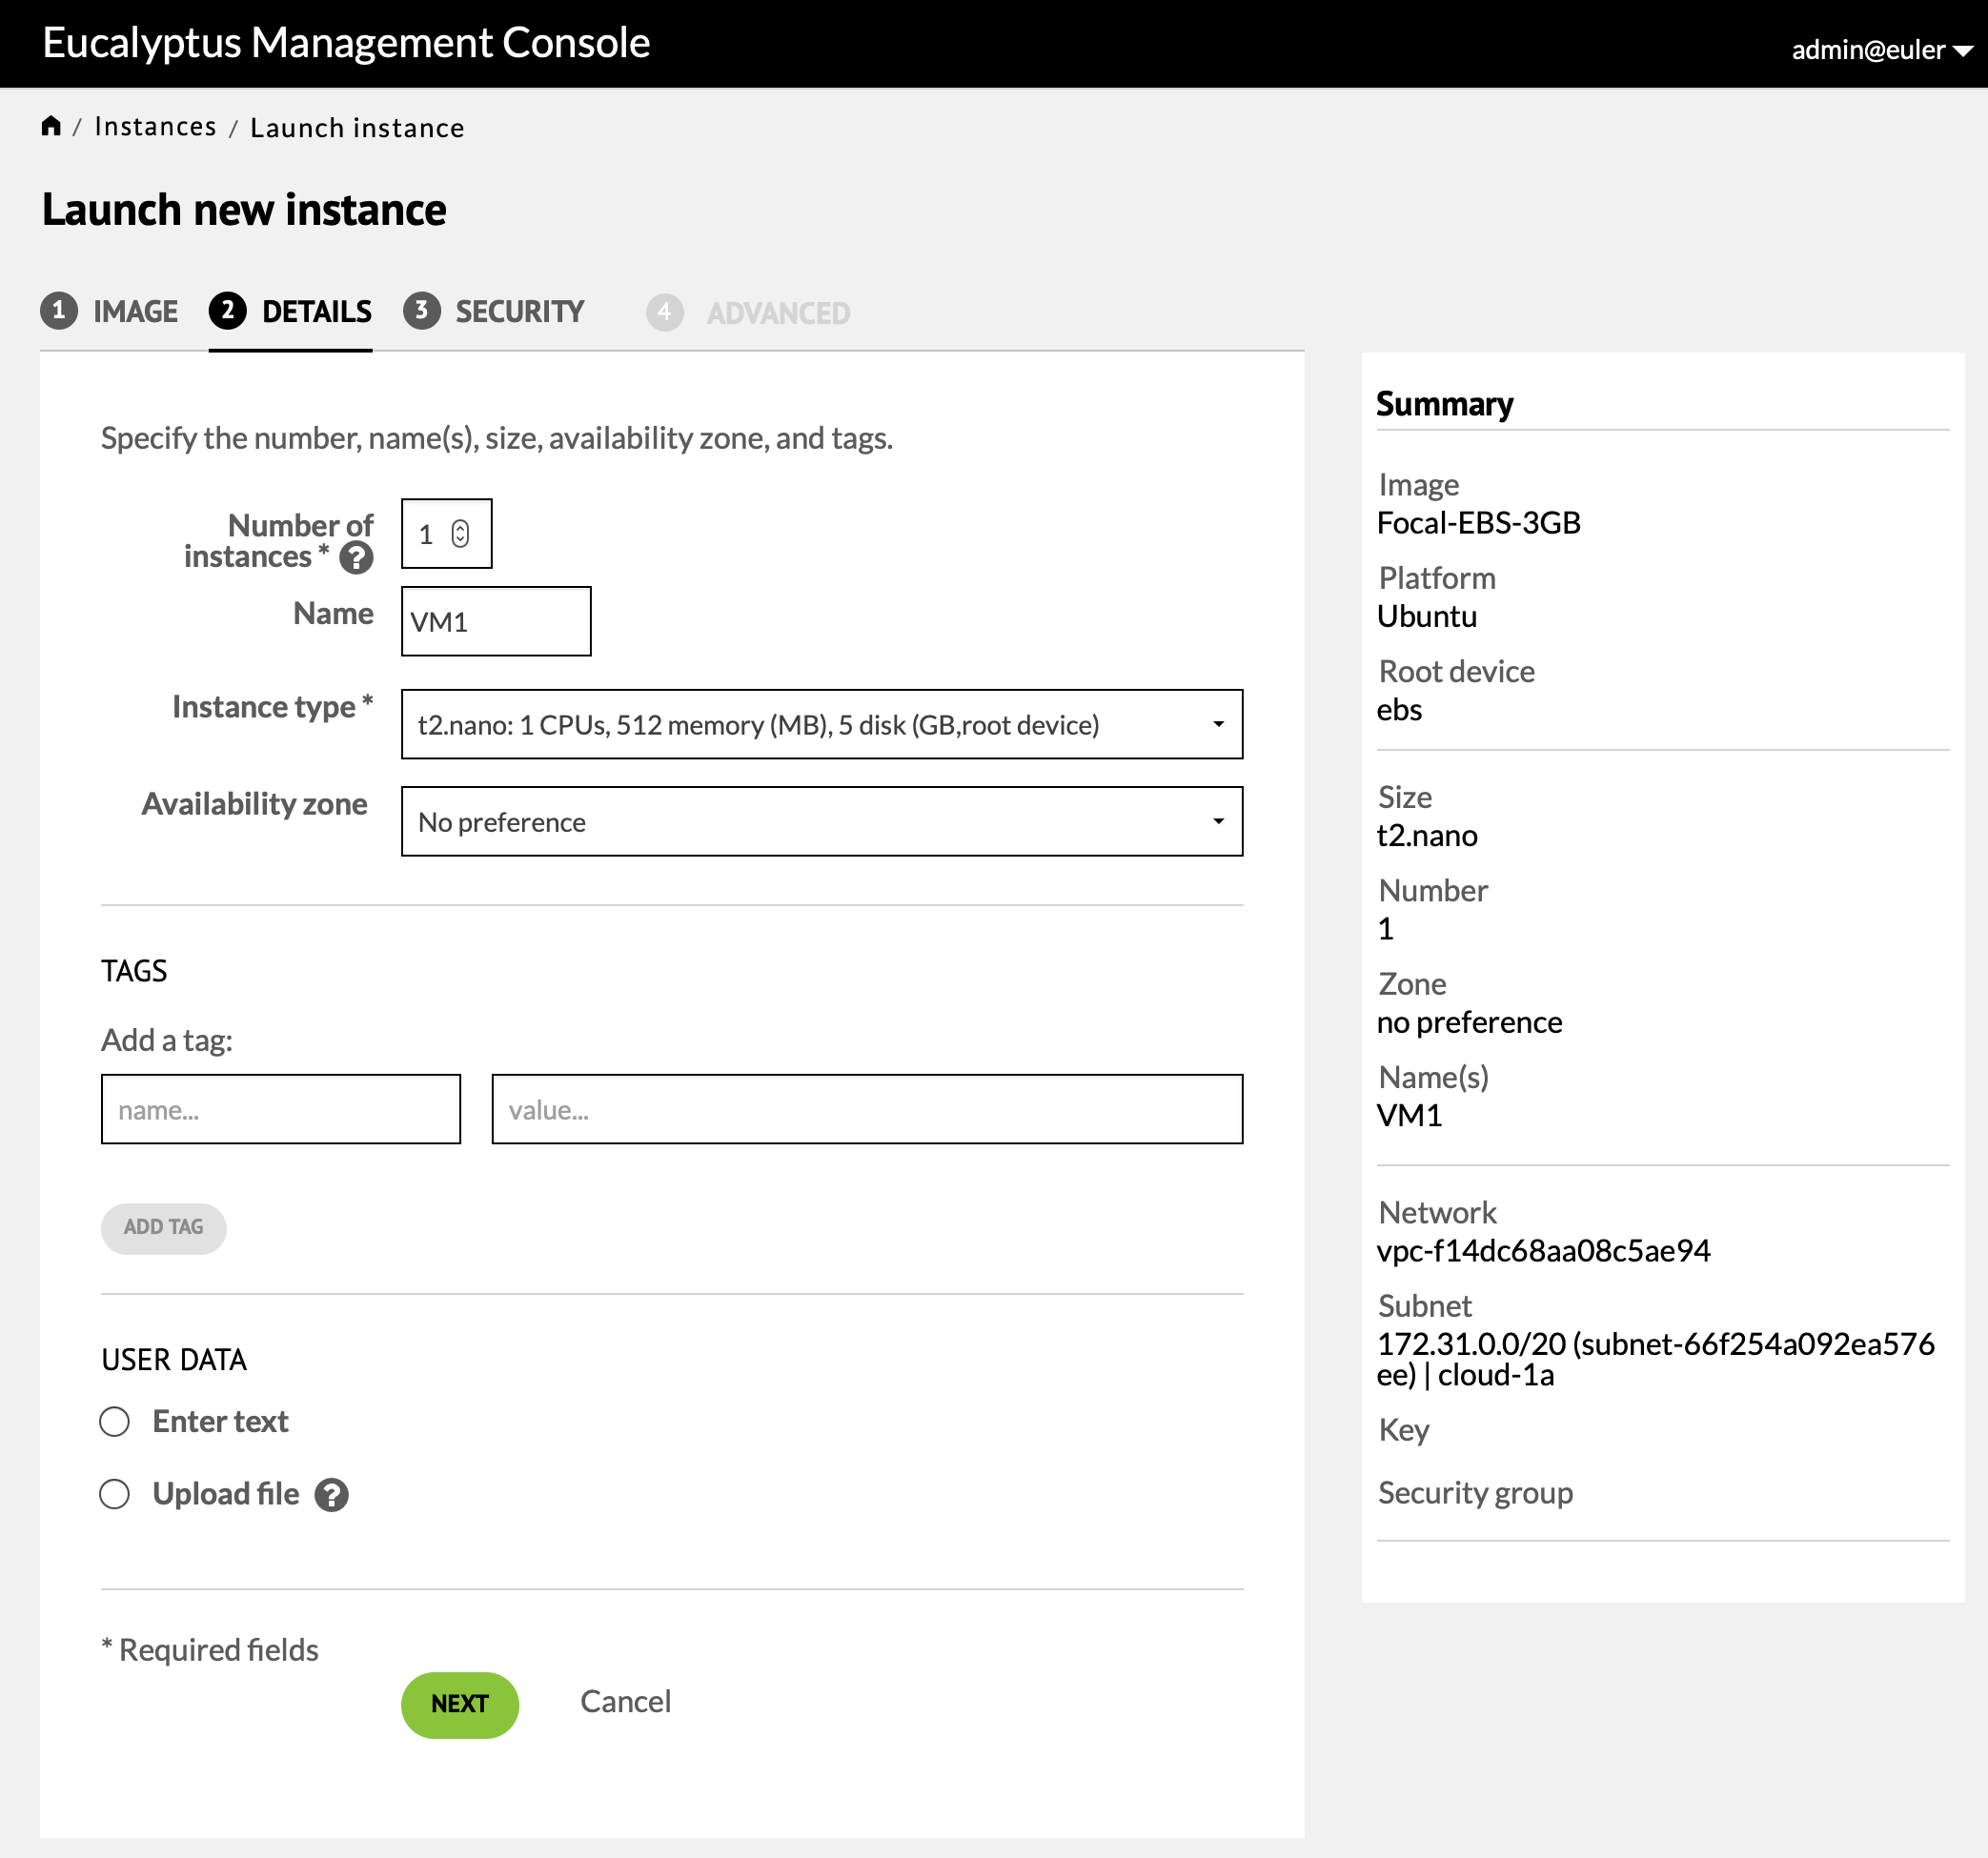
The next screen contains instance details and displays fields for the instance name (use something meaningful to you) and the instance type. Instance machine types follow the AWS naming convention (e.g. t2.nano, t2.micro etc.). Each type consists of a CPU allocation, RAM allocation and root disk device allocation. Since the Eucalyptus Cloud resources are limited and shared across the department pick the smallest type that will accomodate your needs.
Pressing "Next" moves to the security screen. The only fields that may need to be populated are the "Key name" and "Security group" fields. Press "Launch Instance" to create the instance.
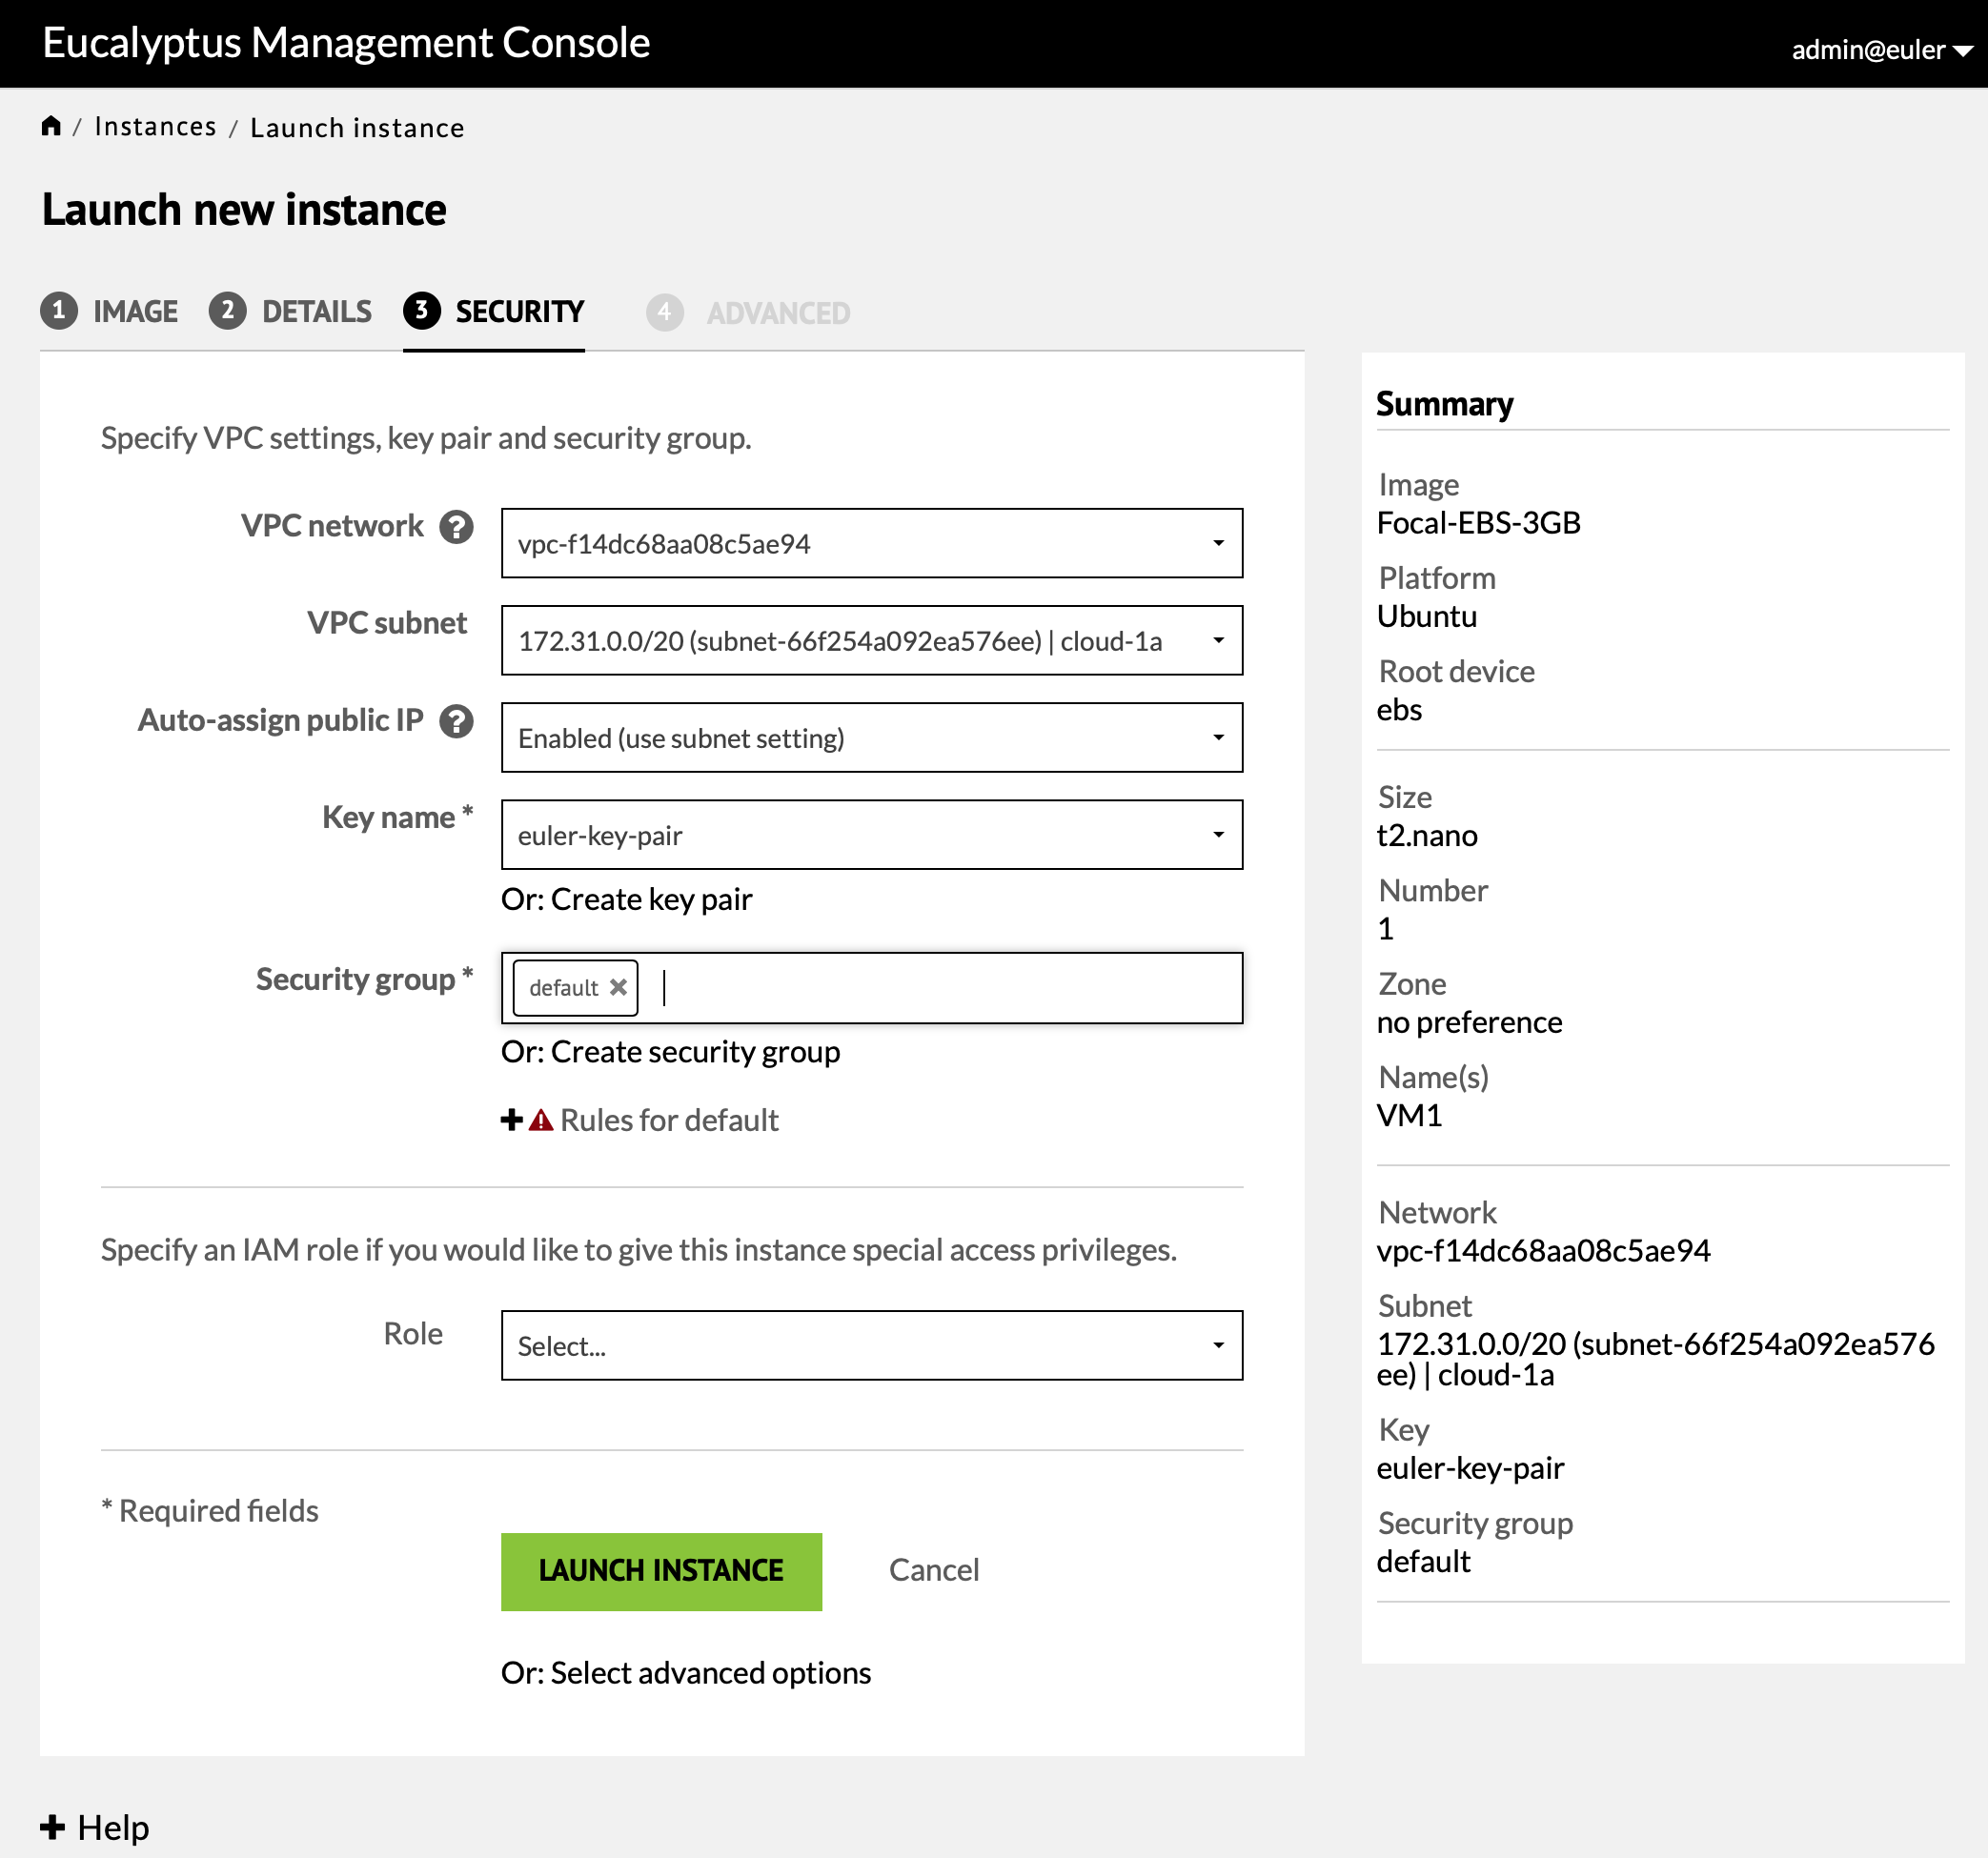
This will return you to the instance list screen which will show the new instance as it starts up.
Advanced Options
Just below the "Launch Instance" button is a link for advanced options. The only thing useful here is the "Storage" section. This shows the root volume for the instance, the device on which it will be mounted, the snapshot of the image from which it comes, its size and whether it should be deleted on instance termination. The size will default to the image size since this is less than the 5GB size allowed for the t2.nano type. If you anticipate needing a larger root device (up to the limit of the instance type) you can change this value. You should always have "Delete on Terminate" selected so this volume is destroyed when the instance is terminated. Carefully estimate your needs and consider both the instance type, which determines the maximum root volume size, and the request boot volume size. You do not want a root device less than you will need and you also do not want to consume more cloud resources than you actually need. If you are working on a project for a class you should have received some instructions on the required instance type and boot volume size.
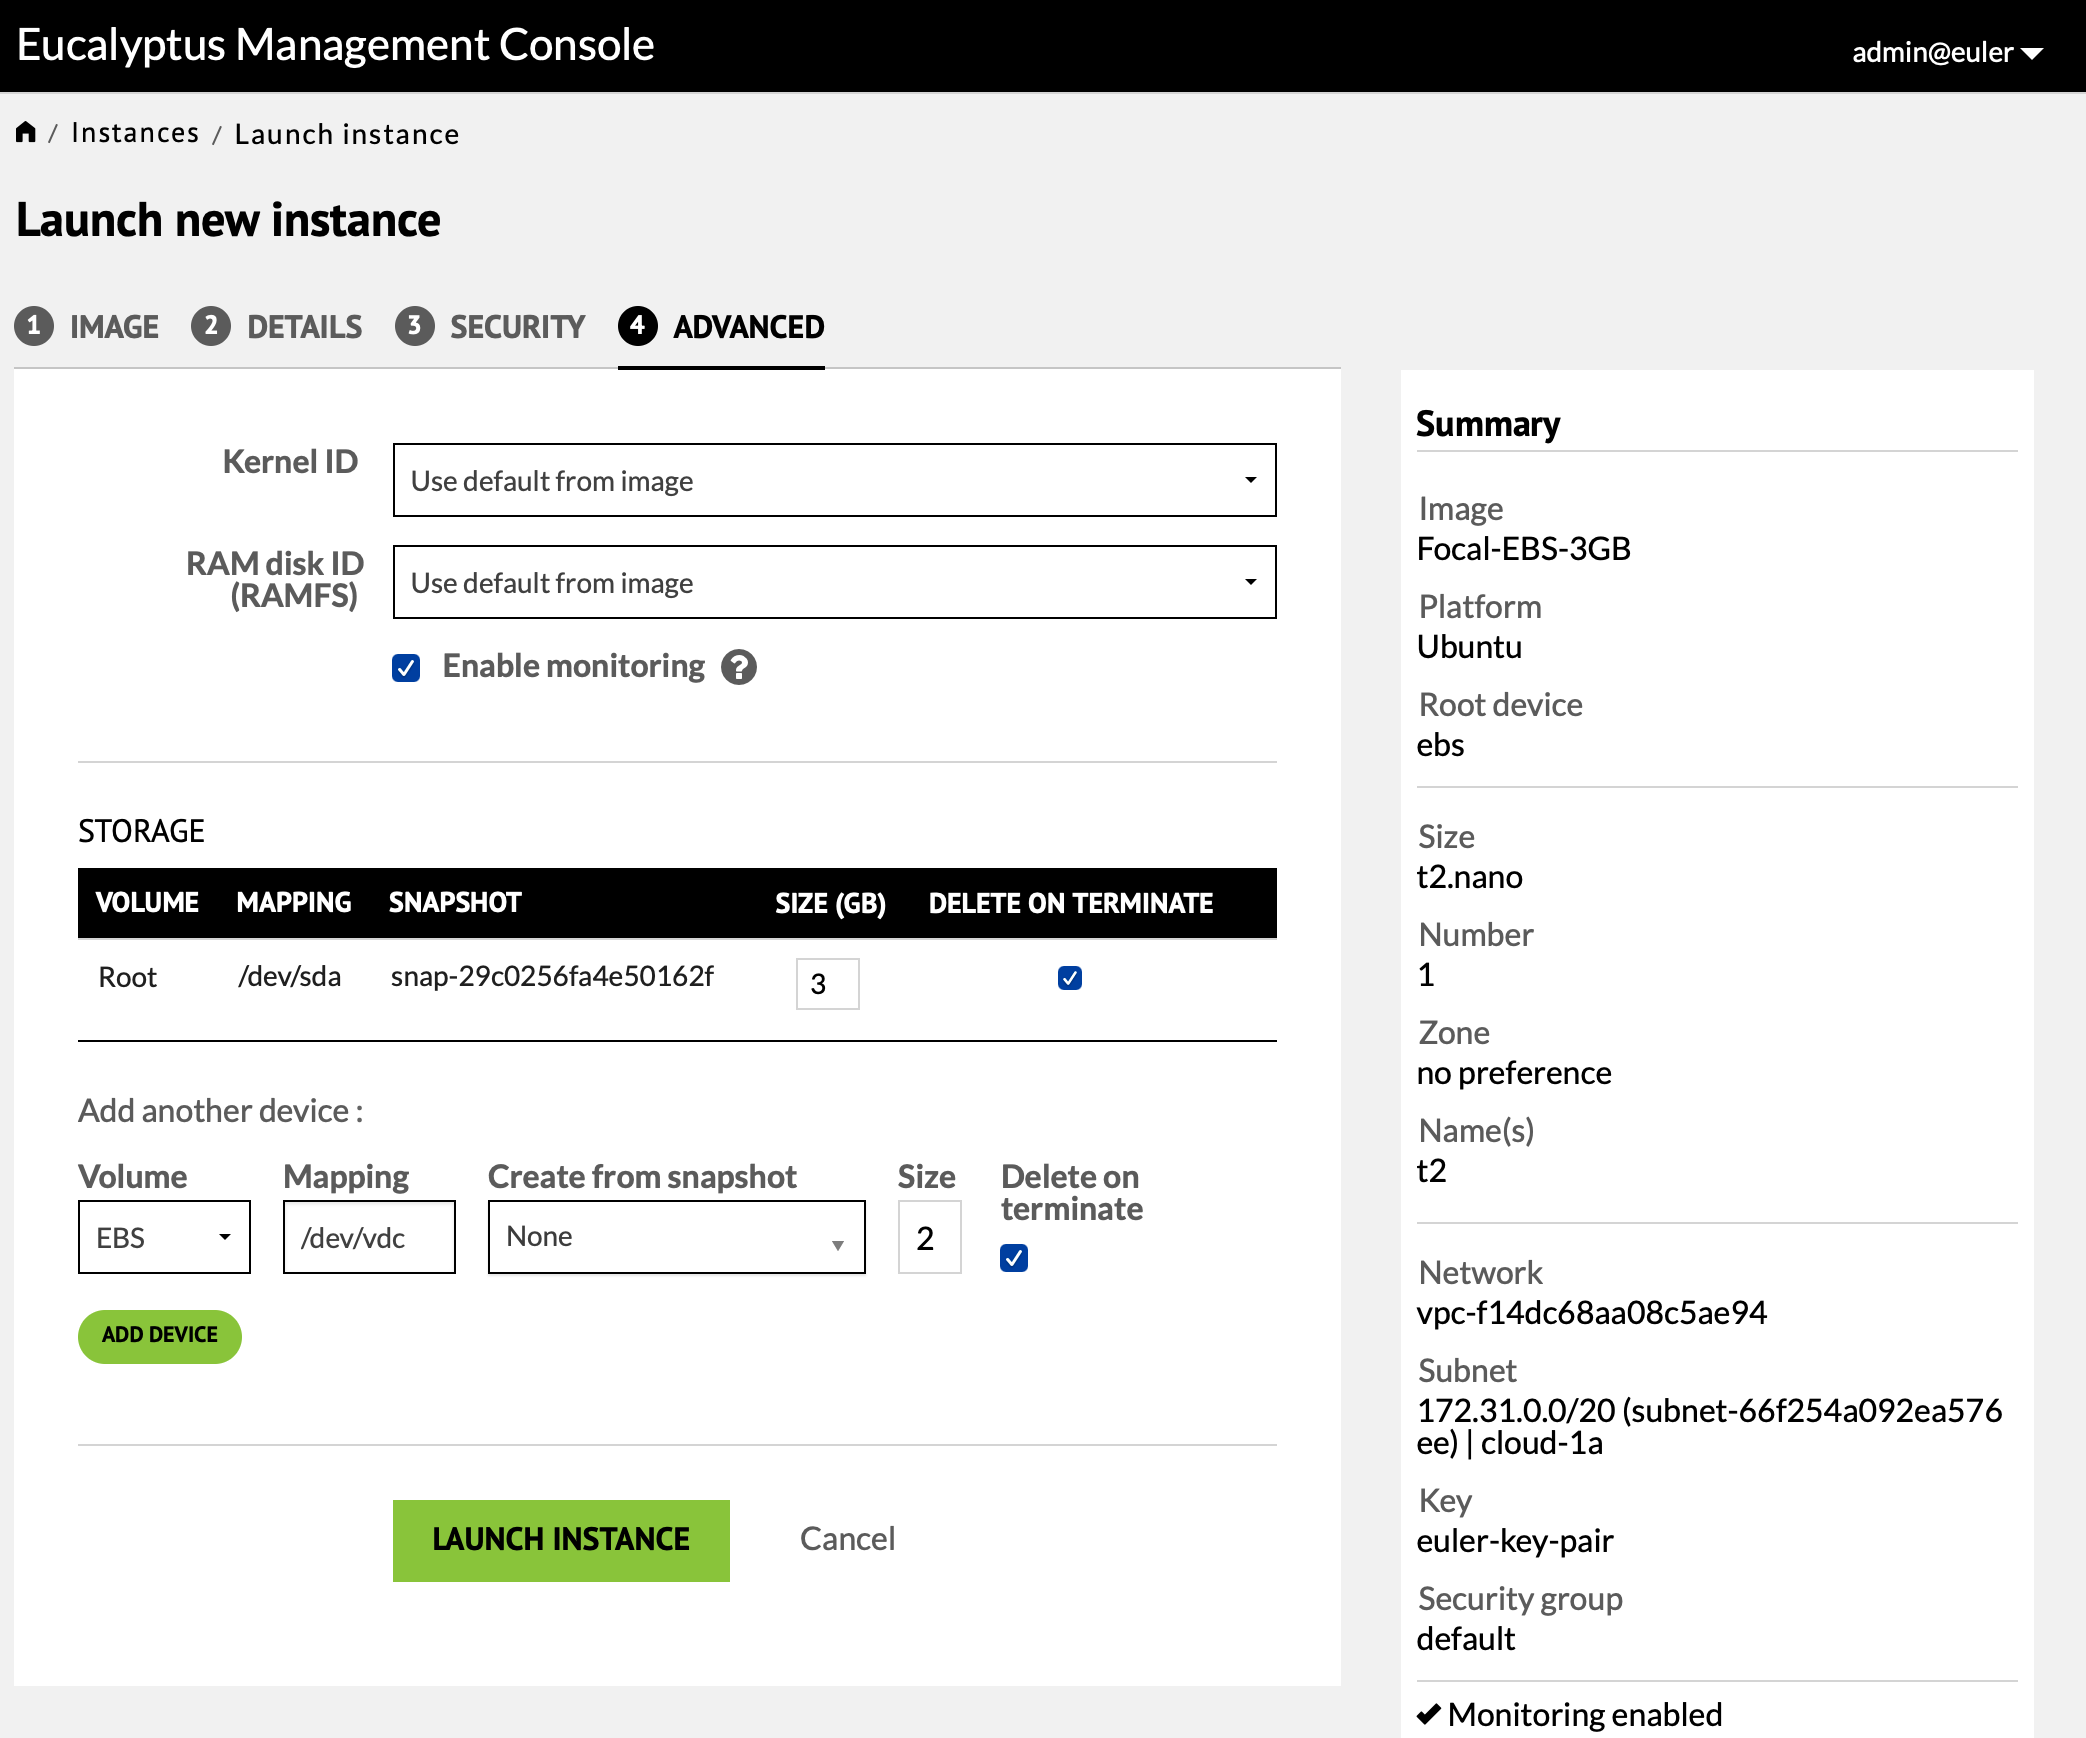
In addition you can create additional volumes to be mounted on the instance. If the volume will contain data that you may want to attach to other instances you would deselect "Delete on termiante". There is also an option to create the volume from an existing snapshot of some other volume but in almost all cases this will be none and you will get a new blank volume. Having a volume for a device does not mean that you have a filesystem on that device. For more details see the section on "Working With Instances".
Working With Instances
Connecting to an Instance
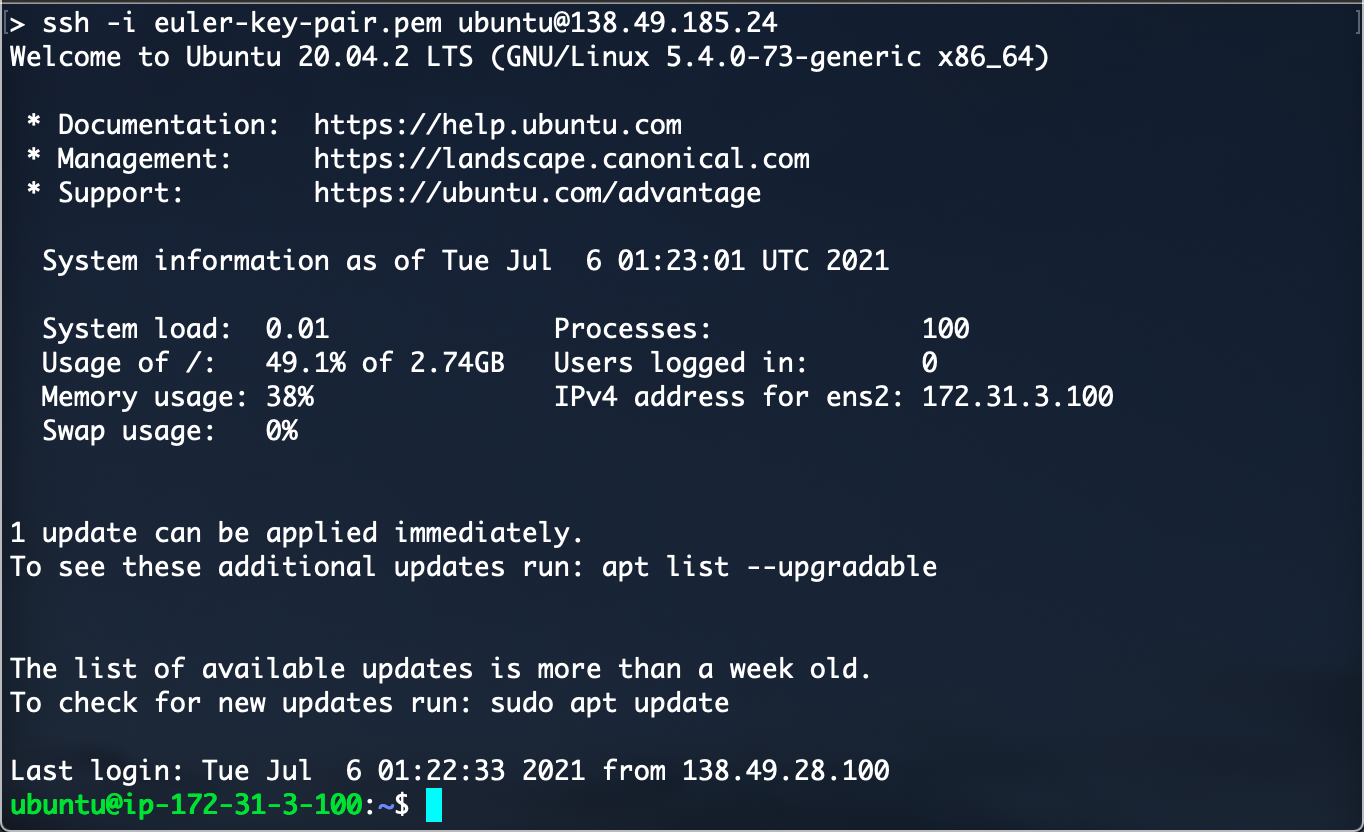
You connect to an instance with ssh using the instance's public ip and key name. The ssh "-i" option gives the filename for the private part of the key pair. For an alternative way to supply the private key see "ssh-add" and "ssh-agent". The instance is identified with the default username (e.g. ubuntu in this case) and the public ip. If you are working from a Windows machine you may need to use the Putty app which has similar capabilities.
It is important to understand that when you ssh to an instance you are logged in as user "ubuntu" ( or "centos" for CentOS images etc). This user does not immediately have root priviledges but can gain those priviledges using the "sudo" command. To run a command that requires root authority you would run "sudo cmd-that-needs-root".
Installing Packages
The available images will contain minimal OS installs. Depending on your needs other packages may need to be installed (e.g. compilers, web servers, database servers, python etc). For Ubuntu based images this is done through the "apt" package manager. For example "sudo apt install gcc" will install the GNU C Compiler. It may sometimes be necessary to first run "apt update" to update the package managers list of available packages. The command "apt upgrade" will install current versions of all installed packages. Images based upon CentOS will use the "yum" package manager. Other OSs have comparable package managers.
Managing Instances
From the running instance list the "Actions" column presents a list of things which can be done with the instance. For an EBS instance you will be able to stop/start, reboot and terminate. For an instance store image you can reboot or terminate. The "Connect to instance" item does not actually connect but tells you how to use ssh to connect. IP addresses are assigned automatically so never use the "Associate IP address" item - it causes trouble.
Moving Files To & From an Instance
You will sometimes need to copy files to an instance or from an instance. In particular, the CS Department is not able to backup all instance volumes, so you are responsible for maintaining backups of any important files on your instance related to your project. There are several ways that this can be accomplished.
The "scp" tool will copy files between your personal computer and a Euca instance. The basic command, when run from your personal computer, looks like "scp /local/file ubuntu@instance-ip:/remote/file" to copy a file from your computer to the instance and "scp ubuntu@instance-ip:/remote/file /local/file" to copy from the instance to your computer. It is possible to run the command on the instance but this would then require your personal computer to be running an SSH daemon that would that would respond to the connection request. If you need to copy a directory structure between machines you could use something like the "tar" or "zip" utilities to bundle the directories into a single file and then "scp" that file. Alternatively, "scp" has a recursive option that will copy directory structures. For more details see the man pages for these utilities.
Another alternative is the "rsync" utility which can be used to synchronize the contents of a local and remote directory. "Rsync" uses SSH to authenticate to the remote system and perform transfers. For more details see the "rsync" man page.
Another choice would be to start a Gitlab repository that you can clone to both your local machine and remote instance and then maintain sychronization using "push" and "pull" operations. See the Gitlab article for more information.
Working With Volumes
While it is best to carefully configure the root volume size when you start an instance you sometimes don't know how much space you will need until after you have been working for a while. If you find that you need more space than was allocated for the root volume you can simply start a new instance with a larger root volume. This choice may be undesirable if you have spent considerable time in installing packages and configuring the instance for work. In this case you can create an additional volume and attach it to your instance. This may also be a good choice if you have code or data that you may want to keep and attach to another instance in the future.
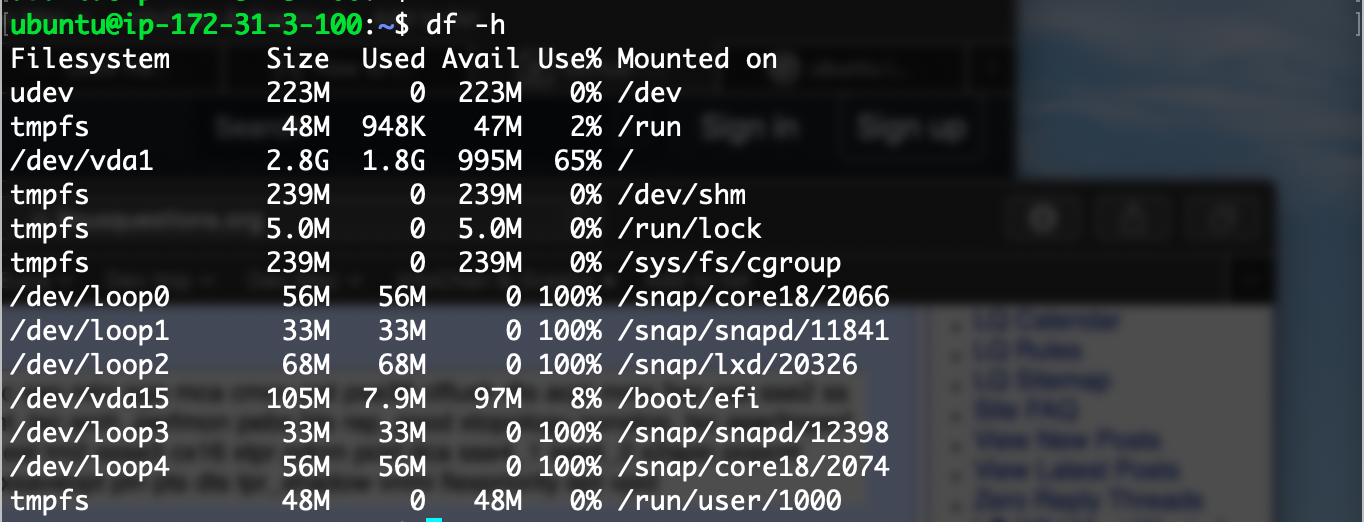
Inside a running instance do a "df -h" which displays mounted filesystems and available space. The important one in the list below is "/dev/vda1" (the "a" device, partition "1") which is the root volume and which is mounted at "/" in the filesystem. We will create a second volume, make this available to the instance as the "b" device and mount it at a place of our choosing within the existing filesystem. This work will be partly done through the Web Dashboard and partly on the command line of a running instance.
From the Web Dashboard: Select the "Volumes" panel and press the "Create New Volume" button. Enter a meaningful name for the volume and a size (e.g. 5GB), the "create from snapshot" option will remain as "None". Press then "Create Volume" button and the system will begin creating the volume. This may take a little time but once available, under "Actions", select the "attach to instance" option. Pick your instance from the pulldown. The "device" field will show "/dev/vdc" which is wrong, change it to "/dev/vdb". Press the "Attach Volume" button. When "attached" connect to your instance using SSH.
From the Instance: Execute the command "sudo fdisk -l". This will show a disk on both "/dev/vda" and "/dev/vdb". Usually physical disks are first partitioned and then filesystems are created in those partitions. Since we will be using this volume only as extra space in our filesystem we can simply create a filesystem on the entire volume with "sudo mkfs.ext4 /dev/vdb". Then create a mount directory at the filesystem root with "sudo mkdir /projectdata" or within the ubuntu home directory with "sudo mkdir /home/ubuntu/projectdata" or in some other location as needed. Finally mount the new filesystem with "sudo mount /dev/vdb /projectdata". Now redo the "df -h" command and you should see a new line for "/dev/vdb".
This process can be reversed by doing "sudo umount /projectdata" and then detaching the volume through the Web Dashboard.
A few notes:
- There are some places in the Web Dashboard where you may see "/dev/sda" or "/dev/sda1". These are incorrect for the Ubuntu based images available on the system and should be "/dev/vda" instead.
- The creation of the filesystem happens only on the first time we try to mount a new volume.
- If you reboot your instance the volume will still be attached but will need to be re-mounted by hand or edit the "/etc/fstab" file (see the man page) to make this happen automatically.
Enabling Swap Space
Instance types specify the number of CPUs, the RAM size and the disk size available to an instance. As we have seen the disk size is really an upper limit and through the advanced options we can request anything in between the image size and this upper limit. If we find we need more storage we can create additional volumes. In contract CPUs and RAM are hard limits and cannot be changed after the instance is launched.
The available machine images do not provide for swap space so the hard limit on RAM size may mean that processes are terminated if memory is exhausted. Typically, the provisioned RAM size is adequate for running several services from an instance. There are occasions that exeed this limit. This sometimes happens when building very large projects or unpacking very large git repositories. In this case enabling swap space for the instance may get you passed a hurdle.
Swap space can be configured either through the a separate partition or by designating a swapfile within the instance's filesystem. Adding a swapfile to a running Ubuntu instance involves first creating a file of an appropriate size with "sudo fallocate -l 512M /swapfile" (alternatively the "dd" command can be used to create an approrpriate file). Change the file premissions with "sudo chmod 600 /swapfile". Configure the file for swapping with "sudo mkswap /swapfile". Finally, turn it on with "sudo swapon /swapfile". Just like with volume mounts this will not persist past a reboot unless you edit the "/etc/fstab" file. A simliar process is used on CentOS.